


Onboarding developers can take months. If a quarter of your team is on Linux, half on macOS, and the last quarter on Windows, you're now contending with squeezing a developer's tools into the peculiar charcteristics of each. Let's call these developer environments. By leveraging GitHub Codespaces and Garden, developers can save time and increase productivity by eliminating the need for local development environments and reducing the setup and configuration time of remote development environments.
GitHub Codespaces is a cloud-based development environment that provides a full Visual Studio Code experience in the cloud, with integrated access to GitHub repositories, issues, and pull requests. Codespaces uses the Dev Containers specification to provide a portable developer environment that can be launched anywhere a Linux kernel is available.
If Codespaces is the rock, the foundation, of your developer environment, Garden is the castle with a veritable armory of plugins and integrations. With its modular architecture, Garden allows developers to easily extend its capabilities and integrate it with other tools like Terraform, Pulumi, or as a complete CI/CD pipeline inside GitHub, GitLab or embedded in any git forge. And best of all, it ships with all these tools, so it's just one binary, one happy path to holistic freedom. If you're interested in the more philosophical underpinnings of holistic development, start reading Whole-Body DevOps where I discuss the kinds of tooling and practices together with Dev Containers you may wish to consider adopting in your org.
In this article, we'll explore how Garden can be used in GitHub Codespaces to build, deploy, and test your application automatically, as you code. We'll cover the following topics:
- A gentle introduction to Codespaces and Dev Containers
- Maximizing developer efficiency with Dev Container features
- Using Garden to deploy applications to a Kubernetes cluster
- Automating common development tasks with Garden
- Setting up a GitHub Codespaces environment for Garden-driven development
Streamline remote development with Garden
Garden already has a number of features that make it a great fit for remote development environments. These include:
A single binary
All the tools a developer needs to deploy cloud-native applications, including Helm, kubectl, Terraform and Pulumi shipped with Garden and accessible via <span class="p-color-bg">garden tools</span>. That makes it easy to to provision a remote environment with minimal dependencies and build times.
Kubernetes for the rest of us
Build inside, and deploy to, a remote or local Kubernetes cluster with ease, just as if it was running on your own machine. Run tests and make changes live with those changes synced to your running container. Your remote cluster can share build resources and cache builds from CI, and other developers, speeding up the build process.
"Remocal": unify local and remote envs
Run the same build and deploy commands locally or in Codespaces. If you decide not to use Codespaces but do take advantage of Dev Containers, you've already plugged the gap between your macOS, Windows, and Linux users, because Dev Containers run with the same capabilities on all three platforms.
One CI pipeline
A shared CI pipeline with your local development environment. Garden's Workflows runs the same way everywhere, in CI, local, or remote. With Codespaces, you can share a pre-configured CI pipeline with your team, and run it locally or inside GitHub Actions or GitLab CI, without having to install any dependencies. No more weeks spent onboarding a developer. And no more git commits to trigger CI builds. Just start coding.
GitHub Codespaces and Dev Containers: same container experience, different deployment options
Dev Containers are just a container image (popularized erroneously as "Docker containers") shipped with the development workbench or tools required for a developer to get their work done. Codespaces are these same Dev Containers running in the cloud.
Whether starting locally or in the cloud, it's up to you to choose your adventure. Local Dev Containers require a host able to run a Linux kernel, whether virtualized or natively. On macOS a user will typically virtualize using HyperKit and on Windows using WSL2. Any host will need to have a container engine installed. For most users, this is via the Docker Desktop application. Codespaces require only a web browser and repository holding your Dev Container files.
We'll start by exploring the Dev Container experience locally, and then move on to Codespaces.
If you wish to follow along, be sure you've
- installed the Dev Containers extension
- installed VS Code as your editor
- installed Docker Desktop. Alternatives that will work are colima for macOS, or the Docker engine installed directly to your host if using Linux or WSL2.
Codespaces are, for all intents and purposes, a hosted version of Dev Containers. So you can have teams on Codespaces and another team running Dev Containers and they'll be able to share the same container images and configuration.
Exploring the power of Dev Containers in Visual Studio Code
Dev Containers are written in JSON and supports comments. Garden publishes images you can use as a starting point for your own Dev Containers and Codespaces to the <span class="p-color-bg">gardendev</span> Docker Hub organization. Here's how you can use one of these images as a starting point for your own Dev Container.
Tip: be specific! Never use the latest tag. Always use a specific version. This will ensure that your dev container is reproducible and that you don’t get unexpected changes. We add the -buster tag to the image to use Debian as a base, which many Dev Container features require.
Tip: if your development environment depends on Azure, AWS, or GCP command-line tools, use the corresponding image. e.g. <span class="p-color-bg">gardendev/garden-gcloud:0.12.51</span>. All of Garden’s base images can be found at Docker Hub.
Maximize development efficiency with Dev Container features: add Docker-in-Docker, Kubernetes, Python and more
Dev Container features are consumable packages of functionality that you can add to your Dev Container. Here I've declared everything I need to develop in Python and run a k3d local cluster we'll use locally and in Codespaces.
Why k3d and not minikube? Because k3d is a lot faster to start up and shut down. And because minikube does not support routable services on Codespaces. If you're using Codespaces, you'll need to use k3d or kind. If you're interested in tracking the progress of minikube support, please follow the issue.
From here, we're already ready to launch into our Dev Container. Type Ctrl-Shift-P and begin typing Dev Containers: Reopen in Container to select.
Generating Dev Containers with jetpack.io's Devbox
Don't want to go to the trouble of writing a Dev Container from scratch? No problem. You can use Devbox to generate a Dev Container for you. Devbox creates portable developer environments using the functional and powerful Nix package manager.
- install Devbox with curl https://get.jetpack.io/devbox | bash
- run devbox init to create a new Devbox project
- add all your project dependencies e.g. devbox add python311 pdm kube3d kubernetes-helm kubectl
- run devbox generate devcontainer to generate a Dev Container
In the generated .devcontainer/Dockerfile add Garden to your image at the top just under the # setting up devbox user block e.g
Developing a simple FastAPI app in a Dev Container: a step-by-step guide
We'll use a simple FastAPI Python app as an example of developing inside a Dev Container. The app is a simple API that returns the current time. Feel free to substitute your own Dotnet or Go app with its corresponding Dev Container feature.
From inside my Dev Container, I'll create a new file called main.py and add the following code:
I declare my app dependencies in a <span class="p-color-bg">pyproject.toml</span> file:
And install the dependencies with pdm install. I’ve installed the PDM Python package manager, which supports a number of Python Enhancement Proposals (PEPs) that standardize certain Python features. Our <span class="p-color-bg">pyproject.toml</span> file conforms to the PEP 621 standard.
Now if we type <span class="p-color-bg">uvicorn main:app</span> in the terminal, we’ll see the app running. We can open the app in a browser by clicking the “Open Browser” button in the bottom right corner of the VS Code window.
Defining a FastAPI app with Garden
We’ll use Garden to build and run our app inside our Dev Container to take advantage of common developer patterns like building and testing. To do this, we’ll create a <span class="p-color-bg">modules.garden.yml</span> file in the root of our project.
Here I've instructed Garden how to build our app. I've also declared a service and an ingress. The service is our app running inside a Kubernetes cluster. The ingress is a way for us to access our service from outside the cluster. Pay particular attention to the <span class="p-color-bg">nodePort</span> line under our service ports. This is the port we'll use to access our service from outside the cluster. We've set it to 30000, but you can set it to any port you like between 30000 and 32767, the port range reserved for NodePorts.
The <span class="p-color-bg">linkUrl</span> line under our ingress is the URL we'll use to access our service from outside the cluster. This is a very handy Garden feature that allows us to rewrite the URL of our service to something more convenient. When we get to launching our Dev Container as a Codespace, we'll see how Codespaces rewrite detected localhost URLs to a routable URL.
Our web server, uvicorn runs on port 8000 by default, so we've set that as the <span class="p-color-bg">containerPort</span>. We've also declared a test, which runs the <span class="p-color-bg">pytest</span> command on our app.
Notice the <span class="p-color-bg">build.targetImage</span> line? Garden ships with support for multi-stage Dockerfiles, which are a great way of separating your dev container from your shipped container image so you can ship a leaner image.
Unlock your Python app’s production potential with multi-stage Dockerfiles and Garden
An example Dockerfile for your inspiration is given below. Notice how our last stage is our Dev Container we label <span class="p-color-bg">devcontainer</span>. We define two additional stages, <span class="p-color-bg">builder</span> and <span class="p-color-bg">production</span>, where the builder stage ships with development dependencies required to produce our production artifacts. We pull those resulting build artifacts into our final production stage. One Dockerfile for all your needs.
Back in your <span class="p-color-bg">.devcontainer.json</span>, replace the <span class="p-color-bg">"image": "docker.io/worldofgeese/garden-devcontainer-python:0.12.51-buster</span>" line with the following:
This tells your Dev Container to only use the devcontainer stage for your developer environment.
This is just one way to interleave your development Dev Container and production environments in a single Dockerfile. You can also use a separate Dockerfile for your production image. Garden supports both approaches.
Deploying a FastAPI app to Kubernetes with Garden
In my <span class="p-color-bg">.devcontainer.json</span> file, I've added the following line to my postCreateCommand:
which is everything you need to auto-launch a local k3d cluster once you've launched your Dev Container from the popup in the bottom right corner of VS Code or by running Dev Containers: Reopen in Container from the Command Palette.
You could launch this app in a remote Kubernetes cluster. Making it easy to run your apps on production-like clusters with ease is one of the killer features of Garden. If you've launched this Dev Container as a GitHub Codespace, you'd then be running development environment in a container on GitHub's servers and launching your app in a Kubernetes cluster on a cloud provider. It's double-remote for double the fun. If you're interested in that approach, read Helm without tears: Maximizing developer productivity with Garden. This article will proceed with the assumption that you're running your app in a local Kubernetes cluster.
Define your k3d cluster in our Garden environment. We'll do this by creating a <span class="p-color-bg">.garden.yaml</span> file in the root of our project.
I’ve set my deployment registry to Docker Hub’s container registry in my user’s namespace. You’ll want to replace these with your own container registry and namespace.
After I’ve logged in with <span class="p-color-bg">docker login</span>, I can deploy my app to the cluster with <span class="p-color-bg">garden deploy</span>. This will build the app’s Docker image and push it to my container registry. It will then deploy the app to the cluster and expose it via an ingress.
Automating common development tasks with Garden: hot reload and tests
With our app deployed to the cluster, we can now automate common development tasks with Garden. We can run our tests with <span class="p-color-bg">garden test</span>. We can also run our app, whether on our local k3d cluster or on a remote Kubernetes cluster, in Dev Mode by running <span class="p-color-bg">garden dev</span>. What is Dev Mode? It’s a way to run your app in a container and automatically rebuild and redeploy it when you make changes to your code. It’s a great way to iterate on your app live without any disruption of manually rebuilding and redeploying your app.
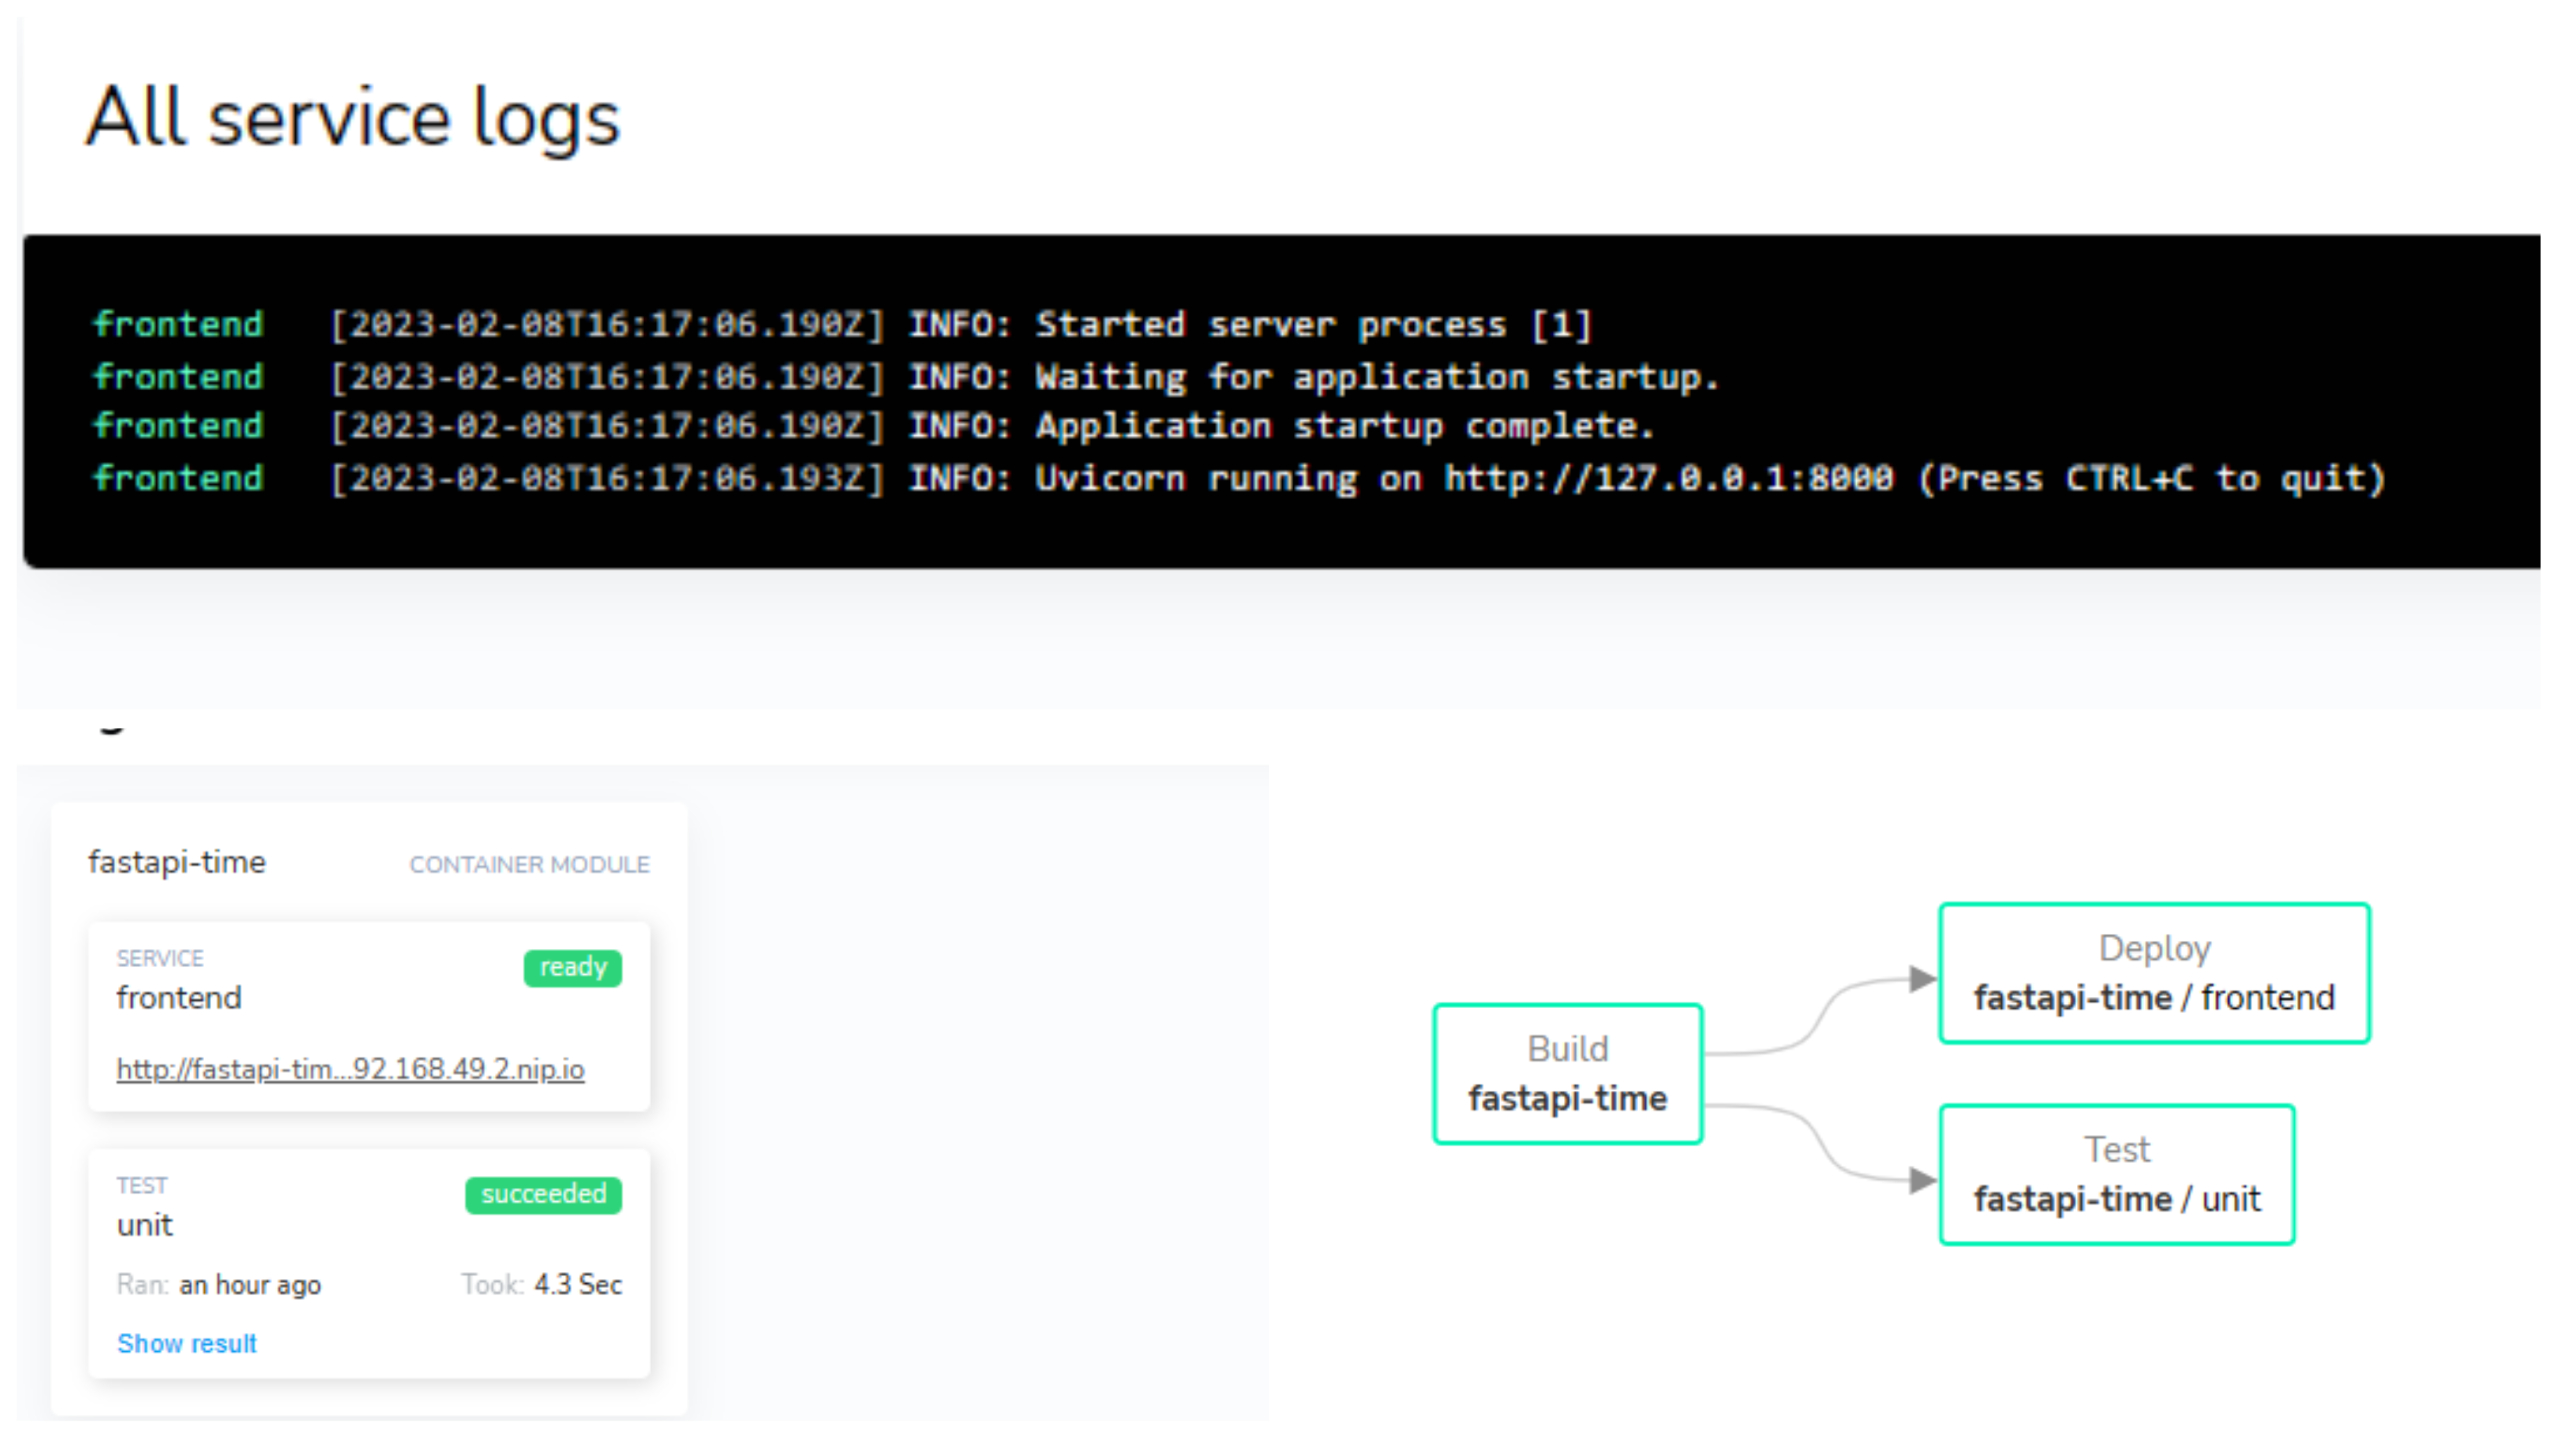
Clicking the dashboard link takes you to a dashboard that shows you the status of your app and its services. You can also see the logs for your app and its relationship to other services as a “Stack Graph”.
Testing a FastAPI app in Kubernetes with Garden
To test the app, just run <span class="p-color-bg">garden test</span>! Garden will run the tests in the container and report the results.
Launch a remote development environment with GitHub Codespaces
GitHub Codespaces offers a generous free tier of 120 core hours per month. For running Kubernetes, you'll need a 4-core Codespaces VM, which translate to 30 free hours per month.
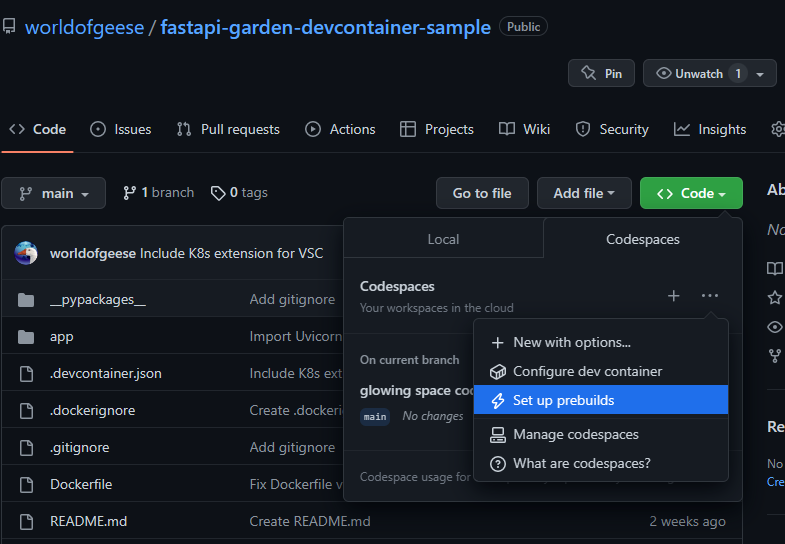
To launch a Codespace, click the "Code" button in the top right corner of your GitHub repo and select "Open with Codespaces". You'll be prompted to create a new Codespace. If you want to launch my Codespace, just navigate to my GitHub repository and click the Open with Codespaces button at the top of the README. If you're bringing your own code, just bring your <span class="p-color-bg">.devcontainer.json</span> and <span class="p-color-bg">Dockerfile</span> or <span class="p-color-bg">.devcontainer</span> folder. Your VS Code extensions will be automatically installed and configured for you in your Codespace if you've activated Settings Sync synced to your GitHub account.
You can also set up pre-built Codespaces that save time when you launch a new Codespace by building your Dev Container ahead of time as a GitHub Action. Visit the official GitHub docs for more on prebuilding Codespaces.
If you've worked on a Dev Container locally, push it to a repository on GitHub first, then launch as a Codespace. You can view all your active Codespaces at https://github.com/codespaces.
If you run <span class="p-color-bg">garden deploy</span> using my code sample, you'll see that our rewritten link URLs Garden returns are clickable. Codespaces rewrites these URLs to accessible endpoints. To see how that works, visit the Codespaces documentation.
If we click the top address, et voilà!
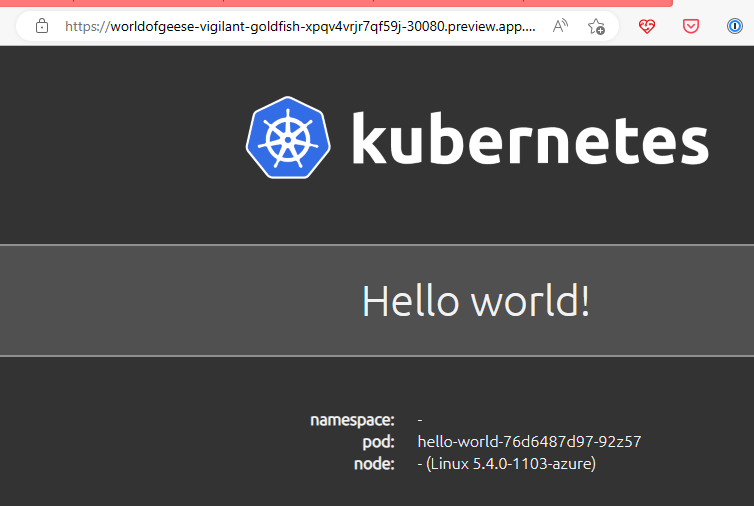
And that’s it! You’ve successfully built, run, and tested a FastAPI app in a remote development environment. You can now iterate on your app fearlessly.
If you’re interested in learning more about how to use Garden with containers, check out our containers guide and containers reference.
Join our community on Discord to ask questions, share your experiences, and get help from the Garden team and other Garden users. Your author publishes The Inner Loop, a newsletter on free and open source software monthly. It’s only good things I love and use in my day to day. You can also follow me on Mastodon.
[Heading image: Katsushika Hokusai, “A strange Japanese scene of people with odd features” (1834) Credit: Wellcome Collection