


Introduction to Helm charts
Love it or hate it, Helm is the ubiquitous package manager for Kubernetes. With Helm you define, install, and upgrade complex Kubernetes applications in “charts”. Charts provide an organized way to bundle Kubernetes manifests as packages with their lifecycle controlled by Helm or other GitOps tools like Argo CD and Flux.
Teams can struggle with Helm because its templating language and imperative mode of operation make it inscrutable and difficult to reason through. Teams instrumentalize Helm with a rat’s nest of tooling that takes weeks of skittering through docs.
In this article, we'll show you how to deploy a Helm chart to Kubernetes using Garden to make the most of automatic tests, dynamic variable injection, easy in-cluster image builds and hot reloading that accelerates your software development lifecycle past anything possible with Helm alone.
Limitations of Helm charts
Helm charts use key-value pairs defined in a <span class="p-color-bg">values.yaml</span> file to configure charts for specific environments and clusters. These values are simply declared, which makes baking advanced logic such as conditionals a chore taken care of by Go helper templates. These helper templates can be difficult for DevOps Engineers to reason through, especially when template functions are used in abundance. Users of Helm are advised to be aware of these and other limitations before adoption.
Not a standalone solution
Platform teams will orchestrate a veritable suite of complex tooling to “plug the gaps” of Helm or extend it. Helm charts require a Kubernetes cluster to be installed and running in order to be used. Users must first set up and configure a Kubernetes cluster before they can use Helm charts to deploy their applications. Additionally, Helm charts are not designed to manage the underlying infrastructure on which the Kubernetes cluster is running, such as the servers and network components. Users must use other tools and solutions to manage these components.
Flaky lifecycle management
If a Helm chart deployment is canceled, a chart can end up in an inconsistent state, requiring manual intervention. Helm’s reliability has improved over time but it remains a problem even in recent versions.
The benefits of using Helm charts with Garden
We’ve read Helm isn’t a standalone solution and that teams reach for rat’s nests of tooling before they’re productive. That’s where Garden is powerful: it’s a holistic tool that takes as its concern your whole software development lifecycle. With Garden, your entire application stack, even down to the infrastructure, is captured. And with Garden Plugins, a cluster can easily be instantiated with infrastructure as code tools like Terraform and Pulumi.
Here is an overview of some of the key benefits of using Helm charts with Garden that we’ll be exploring much more in depth in this article.
Tasks and tests
With Helm charts and Garden, it is easy to run unit and integration tests without pushing your code first to CI. Garden provides a simple and organized way to define and run tests and tasks, making it easy to validate the functionality and performance of your applications.
Easy management of dev, prod, and CI environments
Garden is a tool for deploying and managing Helm charts in various environments, including development, production, and CI. It uses declarative configuration files to define dependencies and infrastructure for Helm charts, ensuring consistent and reproducible environments that can run portably anywhere, whether that’s local, remocal, or your CI pipeline.
Dev Mode AKA Hot Reload
Garden’s Dev Mode allows you to run your application in the cloud or locally, automatically rebuilding and redeploying your application when you make changes to your source code. This makes it easy to iterate quickly on your application and see the changes in real time.
Easy in-cluster image builds
Garden’s support for in-cluster image builds makes it easy to build and push container images from within a Kubernetes cluster. This eliminates the need to set up and manage a separate build environment with no performance penalty to your local machine. No more hot CPU. Dramatically reduced waiting.
Plugins
Garden provides a plugin system that allows you to extend its functionality with plugins. Plugins like Terraform and Pulumi allow you to define the entire lifecycle of your application stack and its underlying infrastructure.
Dynamic variable injection
With Garden, you can easily inject dynamic variables into your application independent of its <span class="p-color-bg">values.yaml</span> file. Whatever values you define in Garden's <span class="p-color-bg">project.yml</span> overlay your base <span class="p-color-bg">values.yaml</span> and they come with the benefit of easy conditionals and other helper functions.
Setting up Helm charts with Garden
To set up Helm charts with Garden, you will need:
- Helm installed: <span class="p-color-bg">curl https://raw.githubusercontent.com/helm/helm/main/scripts/get-helm-3 | bash</span>
AND
- a pre-existing Helm Chart
OR
- a sample Helm Chart created with the aid of helm itself
OR
- existing Kubernetes manifests we’ll convert to a Helm Chart with Helmify
You’ll also need a Garden project.yml we’ll generate. It’s useful to keep Garden’s Helm documentation handy too.
If you’ve already gone through my previous article on migrating from Docker to Kubernetes, you already have everything you need to continue.
I use a Dev Container that comes with a Helm chart example and all the tooling listed above on GitHub. Feel free to make use of it if you just want to get to the code and don’t necessarily want to work through the progressive approach of the entire article.
File structure of a Helm chart
A typical Helm Chart will be organized as follows:
In this example, the Helm chart is organized into the following files and directories:
<span class="p-color-bg">Chart.yaml</span>
This file contains metadata about the Helm chart, such as its name, version, and dependencies.
<span class="p-color-bg">README.md</span>
This file contains instructions and documentation for the Helm chart.
<span class="p-color-bg">templates</span>
This directory contains the templates for the Kubernetes resources that will be deployed by the Helm chart.
<span class="p-color-bg">_helpers.tpl</span>
This file contains helper functions and variables that are used by the templates in the templates directory.
<span class="p-color-bg">deployment.yaml</span>
This file contains the template for the Kubernetes deployment that will be deployed by the Helm chart.
<span class="p-color-bg">ingress.yaml</span>
This file contains the template for the Kubernetes ingress that will be deployed by the Helm chart.
<span class="p-color-bg">service.yaml</span>
This file contains the template for the Kubernetes service that will be deployed by the Helm chart.
<span class="p-color-bg">values.yaml</span>
This file contains the default values for the parameters that can be configured for the Helm chart.
Bring your own Helm Chart
Be sure you’re in the project folder of wherever your chart is contained. If you’re planning to use a chart from the internet, that’s fine too.
Create a Helm Chart from scratch
You can produce a Helm chart skeleton with Helm itself using <span class="p-color-bg">helm create $CHARTNAME</span> where <span class="p-color-bg">$CHARTNAME</span> is whatever you’d like to call your chart. Read Helm’s quick start guide for more.
Generate your Helm Chart with Helmify
If you have a pile of K8s manifests around, the first step is to convert these to a Helm Chart with Helmify. Helmify requires you to pass your K8s manifests to <span class="p-color-bg">helmify</span>from STDIN e.g <span class="p-color-bg">cat my-app.yaml | helmify <span class="p-color-bg">mychart</span></span> Helmify will then generate the chart and save it to the directory <span class="p-color-bg">mychart</span>.
Creating a Garden project and configuring it for use with Helm charts
Once you have generated your Helm Chart, you can create a Garden project and configure it to use Helm charts. To do this, you will need to create a <span class="p-color-bg">project.garden.yml</span> file in the root of your project with <span class="p-color-bg">garden create project --skip-comments</span>.
Let me show you what a minimal working example looks like in garden. This should give you an idea of complexity and time to effective use. The bare minimum Garden needs to work is a project file and a module file:
<span class="p-color-bg">project.garden.yml</span>
<span class="p-color-bg">modules.garden.yml</span>
You can generate skeleton files with defaults by invoking <span class="p-color-bg">garden create project</span> and <span class="p-color-bg">garden create module</span> respectively. As of version <span class="p-color-bg">0.12.48</span> Garden adds a lot of comments to these files, which can make a user think they’re more complicated than they really are. Projects define things like the types of Kubernetes clusters you have, their contexts, your environments (dev, staging, prod), and image registries. Here’s the <span class="p-color-bg">project.garden.yml</span> generated by <span class="p-color-bg">garden create project --skip-comments</span>:
If you’re running a local Kubernetes cluster, like Rancher Desktop, you wouldn’t need to make any changes provided your current context was set to Rancher’s cluster. But we’re building against a remote Google Kubernetes Engine (GKE) cluster so we’ll change the <span class="p-color-bg">local-kubernetes</span> value to <span class="p-color-bg">kubernetes</span>, the provider for remote Kubernetes clusters. You’ll also notice a <span class="p-color-bg">deploymentRegistry</span> key required when building images locally for remote targets like our remote cluster. Alternatively, you can harness the power of your cluster to build images for you, discussed later in “In-cluster image builds removes the need for a separate build environment”.
If you’re developing microservices, you likely have subfolders in your git repository for each, like <span class="p-color-bg">api</span>, <span class="p-color-bg">web</span>, etc. Your module files would ordinarily go there. Garden is smart enough to walk your directory structure and find these module files. Alternatively, you can define all of them at the root level like our <span class="p-color-bg">project.garden.yml</span>, which is what I’ve done above in our <span class="p-color-bg">modules.garden.yml</span> file.
You’ll find more examples in our docs when referencing external charts. We also have a section for configuring modules.
Using Garden in your inner development loop
Garden provides a number of features that can be used in your inner development loop with Helm charts. Here are some of the key ways that you can use Garden to accelerate your development process.
Using Helm charts in your Garden project
Once you have completed these steps, you can use Garden to deploy your Helm Chart in a Kubernetes cluster with <span class="p-color-bg">garden deployl</span>. Garden will automatically install and configure the Helm Chart and its dependencies, allowing you to easily deploy your application to Kubernetes.
Manage dev, prod, and CI environments using Garden
Here’s three powerful additions Garden brings to managing your deployment environments:
- Streamline the process of deploying and managing your Helm chart: Garden provides a simple and flexible CLI tool for deploying and managing your Helm chart in different environments, including development, production, and CI. Just target your environment with a simple <span class="p-color-bg">garden deploy --env dev</span>!
- Provide consistent and reproducible environments: Garden uses declarative configuration files to define the dependencies and infrastructure for your Helm chart, ensuring that your environments are consistently configured and reproducible.
- Simplify collaboration and testing: Garden’s Stack Graph is portable so you can run it anywhere, even in your CI like GitHub Actions and CircleCI. Garden’s 10,000 foot view of all your dependencies brings cached tests and cluster image builds to your whole team with 1-click preview environments and hosted secrets available in Garden Cloud.
From our minimal Project example above we’ll add a <span class="p-color-bg">defaultEnvironment</span> and <span class="p-color-bg">username</span> variable, which together will determine our default namespace demarcated by our username. Feel free to change the username variable for your own. The hostname we expect to reach our service at in each environment are optional.
<span class="p-color-bg">project.garden.yml</span>
Our biggest change to our modules is the addition of a new container type module that will take care of dependently building a new image whenever a change is made to source code. Because we’ve set <span class="p-color-bg">build</span> and <span class="p-color-bg">values.image</span> in the helm module, our Helm chart will automatically source our image and deploy the freshest code to our cluster. Notice how I’ve made use of <span class="p-color-bg">variables</span> at the module level: Garden can pass outputs like these among any number of modules or projects. With variable templating like this, you can set environment specific variables as I’ve done in <span class="p-color-bg">flask-app-image</span> and setting the <span class="p-color-bg">FLASK_DEBUG</span> variable appropriately in our <span class="p-color-bg">flask-app</span> Helm chart.
<span class="p-color-bg">modules.garden.yml</span>
If you’re interested in bringing Garden into your CI workflow, have a read of our docs where we cover using Garden in CI.
Easily set up and tear down your database using Garden Tasks
One of the key benefits of using Helm charts in your Garden project is the ability to run Tasks. With Garden, you can define tasks that can be run to perform common operations before a service such as setting up a database, seeding it with data, and tearing it down. This makes it easy to quickly set up and reset your database during development, allowing you to iterate quickly and test your application in different scenarios.
Using our example local Helm chart, we can create and seed our database by including two commands, as Tasks:
You’ll notice a few new fields here, including <span class="p-color-bg">serviceResource</span> and <span class="p-color-bg">tasks</span> and some new <span class="p-color-bg">dependencies</span>. Garden Tasks require a serviceResource because Tasks are just pods with a very specific mandate. They go out and do their thing then violently rupture into the Æther. Another helpful comparison is to Kubernetes’s Jobs resource. The <span class="p-color-bg">serviceResource</span> is identified by a Deployment, DaemontSet, StatefulSet or Pod resource. Because I know my Flask app Deployment named “web” has all the programs needed to run my Tasks, I set it as the <span class="p-color-bg">serviceResource</span>.
The dependencies are a bit tricky and worth explaining: Tasks only run automatically when they are depended on by other tasks or modules. I can’t list my dependencies in order like this:
I need to depend on the tasks in reverse order to ensure they all fire correctly. So the <span class="p-color-bg">seed-db</span> task is depended on at the Module level, then <span class="p-color-bg">create-db</span>, the first task I want to fire, becomes a nested dependency of <span class="p-color-bg">seed-db</span> and itself depends on <span class="p-color-bg">my-cockroachdb</span>. This is a bit of a gotcha, but it’s worth it for the flexibility it gives you in your workflow.
Use Dev Mode to rapidly iterate
Another key feature of Garden is its support for dev mode. When you enable dev mode with <span class="p-color-bg">garden dev</span>, Garden will automatically rebuild and redeploy your application when you make changes to your source code. This allows you to quickly see the effects of your changes in real time, without having to manually rebuild and redeploy your application.
To our example with support for Garden Tasks, we’ll now add support for Dev Mode:
Under <span class="p-color-bg">devMode</span> is <span class="p-color-bg">command</span>, which rewrites our Helm chart’s default command with our own. Under <span class="p-color-bg">sync</span> we define our local source and remote target. I’ve defined the same file paths as in my <span class="p-color-bg">Dockerfile.dev</span>. Garden will watch live for any changes to code in this source directory and sync it over to my remote container. Pretty neat, right?
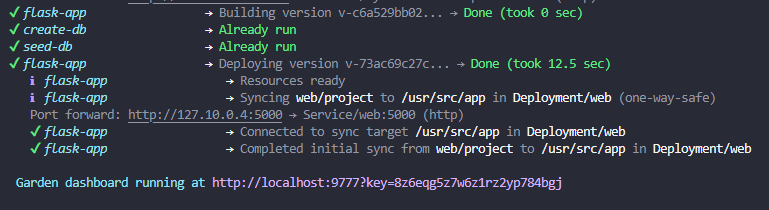
You’ll notice a long time to run some of these initial tasks. If I run it again, because Garden caches everything (including Tasks), Garden already sees is as run and skips it. Notice too that a link to my Garden dashboard is given. In VS Code, open this link with a ctrl-click. You may see VS Code offer to open the detected port for you: don’t do this as it drops the <span class="p-color-bg">key</span> portion of the link, which is required for you to visit the dashboard.
Using Garden in your inner development loop with Helm charts can save you time and effort when developing applications for Kubernetes. Garden’s support for tasks and dev mode makes it easy to set up and manage your development environment, allowing you to focus on building and iterating on your application.
Test your code as you write with Garden Tests
With Garden Tests, you can easily test your code as you write it. Simply define your <span class="p-color-bg">tests</span> in a tests block and Garden will run them automatically whenever you deploy or, if you’re in Dev Mode, as you write and save your code. This allows you to catch errors and bugs early on. So why wait until the end of your development process or CI to test your code? That’s time spent waiting when you could have been in flow.
I’ll add <span class="p-color-bg">tests</span> at the same top-level of my <span class="p-color-bg">flask-app</span> module as <span class="p-color-bg">tasks</span>. To my example (or your own), format your block like so:
Tests in Garden are similar to tasks in that they run a short-lived pod that runs only the command you’ve provided before terminating. I’ve set the dependency to its parent module so it runs after my Flask app has run its own dependency cycle block (waiting for the database to be started and the <span class="p-color-bg">seed-db task</span> to complete). Now, using <span class="p-color-bg">garden dev</span>, any tests defined will run automatically, and cached. If you want to run Dev Mode without automatic tests use <span class="p-color-bg">garden deploy --dev</span>: you can still run all test by running garden test or you can run any test by name e.g. <span class="p-color-bg">garden test my-test</span>.
Building and deploying images automatically using Garden
Building and deploying images automatically using Garden is another advantage Garden brings to your Helm charts. As we saw earlier, we can tie a container module to our helm module and Garden will rebuild and push that new image with our Helm chart whenever it changes.
There’s a second big advantage: Garden supports in-cluster image building, which means that you can build and push Docker images from within your Kubernetes cluster. This eliminates the need to set up and manage a separate build environment, making it faster and easier to build and deploy your applications. This has the additional benefit of saving time pushing from your local machine to a registry, then pulling from the registry to your cluster because builds are cached locally and in your remote registry. To set this up take the <span class="p-color-bg">kubernetes</span> block from our <span class="p-color-bg">project.garden.yml</span> and append <span class="p-color-bg">buildMode: cluster-buildkit</span>:
Garden offers the option to run BuildKit rootlessly reflected in the configuration above. You’re welcome to give it a try!
If you’re running an Autopilot cluster, in-cluster image builds are not currently available. If you’re running an AKS, EKS or Standard GKE cluster, you’re all set to continue.
I’ve been running <span class="p-color-bg">docker login</span> when first starting my development environment, which gives my local user rights to push to Docker Hub. We’ll need to do the same but for our cluster so it can pull and push with the same rights as I have. The official Kubernetes docs have a section on transforming local Docker Hub credentials to a Kubernetes Secret. First, <span class="p-color-bg">docker login</span>, then create the secret from your local credentials:
Then append an <span class="p-color-bg">imagePullSecrets</span> block to the above like so:
Best practices for using Garden in your workflow
There are several general best practices for using Garden in your workflow. These best practices include using Garden tasks to automate common operations, using Garden tests to test before CI, and using Garden’s Dev Mode to quickly iterate on your application. Make good use of Garden’s plugin system to extend its functionality, and use Garden’s in-cluster image building to build and deploy your Docker images and save your laptop’s resources for running the things that really matter, like Slack.
Conclusion
Cleanup environment
It couldn’t be easier to destroy your environment when you’re finished. Just run <span class="p-color-bg">garden delete environment</span> and Garden will clean up all the resources it created. If you’re using a cloud provider, you’ll also need to delete any resources you created manually, like the Artifact Registry repository. Deleting stacks of services like these with one command is a boon to teams looking to quickly spin up and tear down environments. It’s also a great way to keep your cloud provider costs down.
Recap of the benefits of using Helm charts with Garden
Using Helm charts with Garden provides several benefits for deploying and managing applications in Kubernetes. Some of the key benefits include the ability to easily run tests and tasks, support for hot reload (Dev Mode), easy in-cluster image builds, an ever-expanding plugin ecosystem, and easy management of environments. Using Garden in your inner development loop with Helm charts can save you time and effort when developing applications for Kubernetes, and following best practices can help you get the most out of these tools.
If you’re interested in learning more about how to use Garden with Helm charts, check out our Helm guide and Helm reference. If you’re interested in learning more about how to use Garden with Pulumi, check out our Pulumi guide and Pulumi reference.
Join our community on Discord to ask questions, share your experiences, and get help from the Garden team and other Garden users. Your author publishes The Inner Loop, a newsletter on free and open source software monthly. It’s only good things I love and use in my day to day. You can also follow me on Mastodon.
[Heading image: Ohara Koson, "Suichu no Kakucho" (Wild Geese) (1928). Credit: New Bedford Whaling Museum]