

Setting up a development environment can easily take several hours if not days. This is especially true when it comes to onboarding a new developer. Even in the best of cases, local setup-related issues like database misconfigurations will still end up occurring during development.
Using pre-configured cloud-based development environments means developers won't need to independently set up their own environments. This will not only cut down on developer onboarding time but also avoid configuration problems down the road.
In this article, we'll demonstrate how to build a reliable cloud dev environment using Gitpod workspaces and how you can use it for several software development scenarios.
What is a cloud dev environment?
With cloud dev environments, developers spin up their development environment based on a well-known configuration containing all the necessary dependencies and tooling. This helps you and your team avoid the grueling process of setting up a local development environment yourself.
Benefits of cloud dev environments
In addition to saving setup time, there are several other benefits to using a cloud development environment, including improved developer experience, increased scalability, and better cost savings.
Improved developer experience
One of the most notable benefits of a cloud dev environment is an improved developer experience. These environments make it easy for developers to focus directly on building features and delivering value instead of juggling local setups and configuration mismatches.
They also help reduce manual errors since every developer will spin up their environment from a well-known baseline configuration, avoiding configuration drift challenges.
A developer's time is expensive and it should be utilized effectively. Cloud dev environments help companies spend money wisely and allow developers to focus on delivering value to the company while avoiding monotonous tasks.
Scalability
Cloud dev environments are easier to scale up and down. For example, if you need to install a resource-intensive tool in the environment, the developer can easily scale it up when they're working with the tool and then scale it back down when finished. As a bonus, this also helps to reduce costs since the resources are only increased when needed.
Easier testing
Cloud dev environments allow developers to work in production-like environments. This provides them with a consistent environment and proper data to perform testing before merging the code.
Cost savings
A decent developer laptop costs between $3,000 and $4,000 USD, and probably needs to be updated every few years. This expense can quickly add up.
However, cloud dev environments can be instantiated with a low-spec laptop and rented for an affordable monthly fee instead of an upfront investment. You can use a tool like a GitHub pricing calculator to do the exact math. Moreover, since these environments are disposable, you can optimize your usage time to cover business hours only (*ie* forty hours per week).
Abstraction and fault tolerance
The blue screen of death is something all developers know well and try hard to avoid. Technical issues can screw up your development environment and force you to format your laptop and start everything from scratch.
When your environment is in the cloud, not your local computer, you can enjoy all the high availability and fault tolerance capabilities of the cloud while avoiding the nuisance of a local environment's potential failures.
Cross-team collaboration
Because cloud dev environments allow developers to configure their development environments jointly, cross-team collaboration is not only possible but easy. For instance, if you have a developer that identifies that a particular Visual Studio Code extension would help lint Python code, they can configure the environment to include that extension. In this scenario, the extension will be automatically available for every developer who spins up a dev environment from the same configuration.
Moreover, quality assurance (QA) teams can quickly spin up preview environments from feature branches to give feedback to the developers about their work early on without waiting for the developer to submit a PR request or waiting for the PR to be approved and merged. This reduces the feedback cycle and helps developers to identify issues earlier in the process.
Ephemeral environments
Ephemeral environments are designed to be short-lived and isolated. This means you can easily fix errors or make changes without affecting other developers who are spinning up the same environment.
Cons of cloud dev environments
Despite their many benefits, cloud dev environments are not silver bullets. They come with challenges that you need to take into consideration, including the following:
Internet dependency
Since these environments are hosted in the cloud, they're not accessible without an internet connection, which makes them an unsuitable option for developers with limited or no internet access. However, this point won't be particularly relevant if your cloud dev environment is self-hosted in your company infrastructure.
Complex initial setup
When you configure the dev container file, the initial setup can quickly get complicated if your development environment requires a lot of specific dependencies and customizations (more about this later).
Unnecessary costs
If a developer forgets the environment is running, it will incur excessive financial charges. However, this can be avoided by configuring a suitable timeout period after inactivity.
Longer setup time
Setting up a cloud dev environment usually takes longer than working directly on the local computer. The longer setup time is due to the network and resource constraints of the cloud. However, some tools, such as Garden, can speed up the setup time by improving the dependency graph of building the various system components.
Vendor lock-in
The environment configurations are highly vendor-dependent, making migrating to a different vendor challenging. The degree of migration difficulty will depend on how complex your project is, how easy it is to map the configurations in the source vendor to the destination vendor, and whether all the features you need are supported.
Implementing a cloud dev environment
There are various solutions available to help you implement your cloud environment.
One famous example is Binder, which is a cloud dev environment that enables running Jupyter Notebook in an executable environment similar to Google Colaboratory. Binder focuses mainly on Python, Julia, and R programming languages.
A couple more famous examples are GitHub Codespaces, Garden, Replit, and Gitpod which provide more comprehensive environment options than Binder and support a wider range of programming languages.
In this section, we'll focus on Gitpod, which is a development environment that is fully hosted in the cloud. It lets developers spin up a wholly configured environment using ordinary development tools, such as Visual Studio Code, Jupyter, or JetBrains. The environments also include settings, extensions, and any relevant configuration the developer needs.
Gitpod operates on workspaces that run through the browser, making them an ideal option for low-spec machines.
Create a Gitpod workspace and fork the repository
In order to use Gitpod, you need to have a personal GitHub account. If you don't have one, make sure you choose the free tier when you join as it's sufficient for this tutorial.
In addition, if you don't already have a Gitpod account, navigate to Gitpod's website and click on **Start for free** to create your account.
Then, install the Gitpod Chrome extension. This enables you to launch a Gitpod from your GitHub repository.
For this tutorial, you'll be using some sample code that is a C# solution containing three projects:
1. **<span class="p-color-bg">SimpleCalculator</span>** represents a calculator that does the four basic arithmetic operations (addition, multiplication, subtraction, and addition).
2. **<span class="p-color-bg">SimpleCalculatorClient</span>** represents a simple console application that uses the SimpleCalculator.
3. **<span class="p-color-bg">SimpleCalculator.Tests</span>** represents four-unit tests for the arithmetic operations. The repository also includes <span class="p-color-bg">.gitpod.yml</span> and <span class="p-color-bg">gitpod.Dockerfile</span> files, which are the configuration files you need to run the Gitpod for .NET application.
Fork the repository by clicking on **Fork > Create a new fork**:
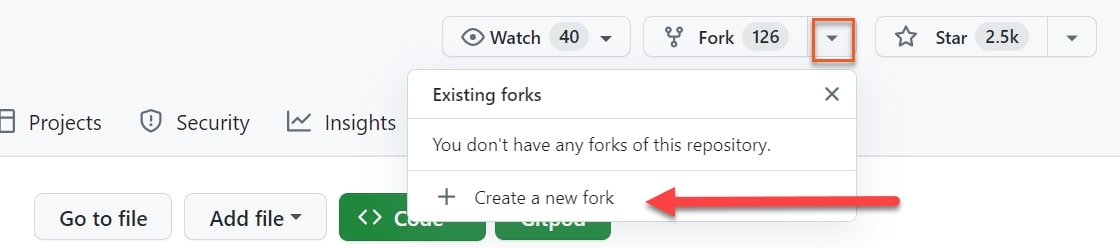
You'll be redirected to another page where you can create a fork in your personal account by selecting **Create fork**. This essentially makes a copy of the source code in your repository so that you have the necessary administrative privileges.
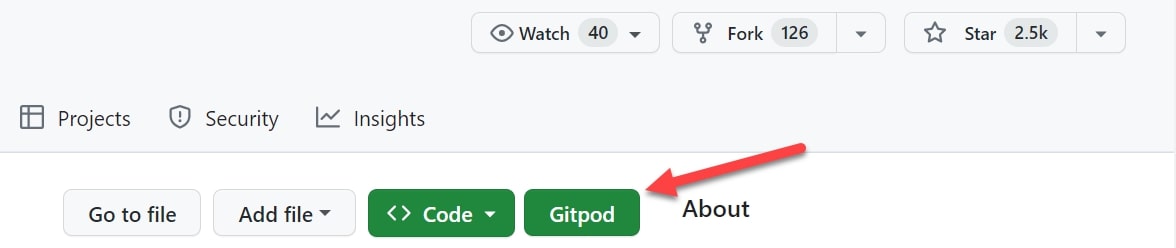
Next, click on **Gitpod** to create your first Gitpod workspace:
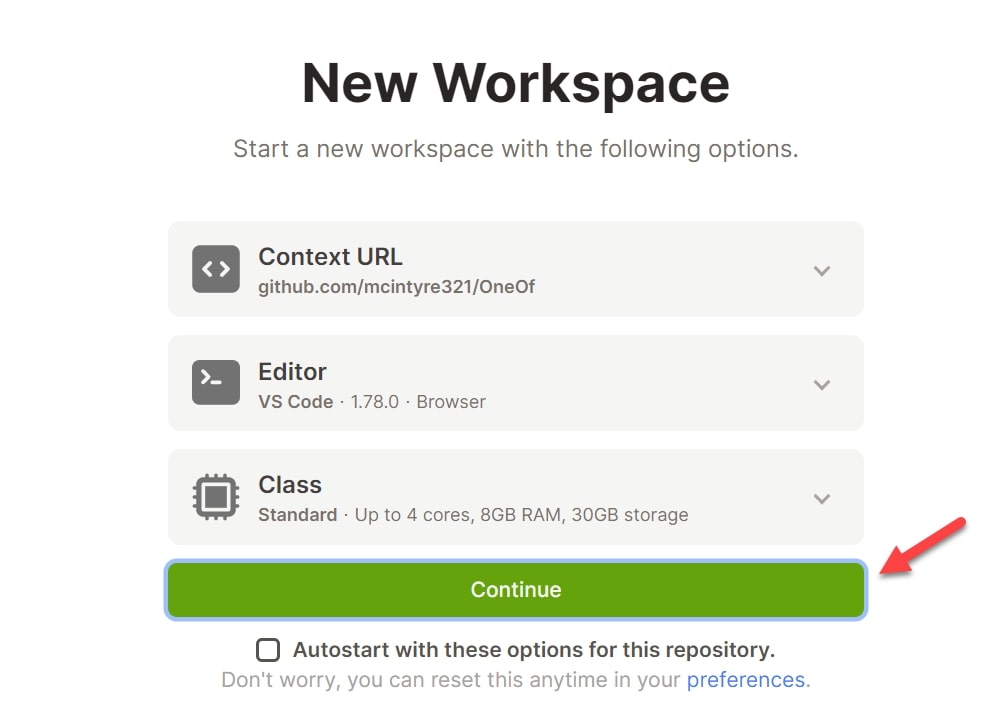
If you're a new user, you’ll get a prompt to configure the Gitpod workspace. Keep the defaults as they are and select **Continue**:
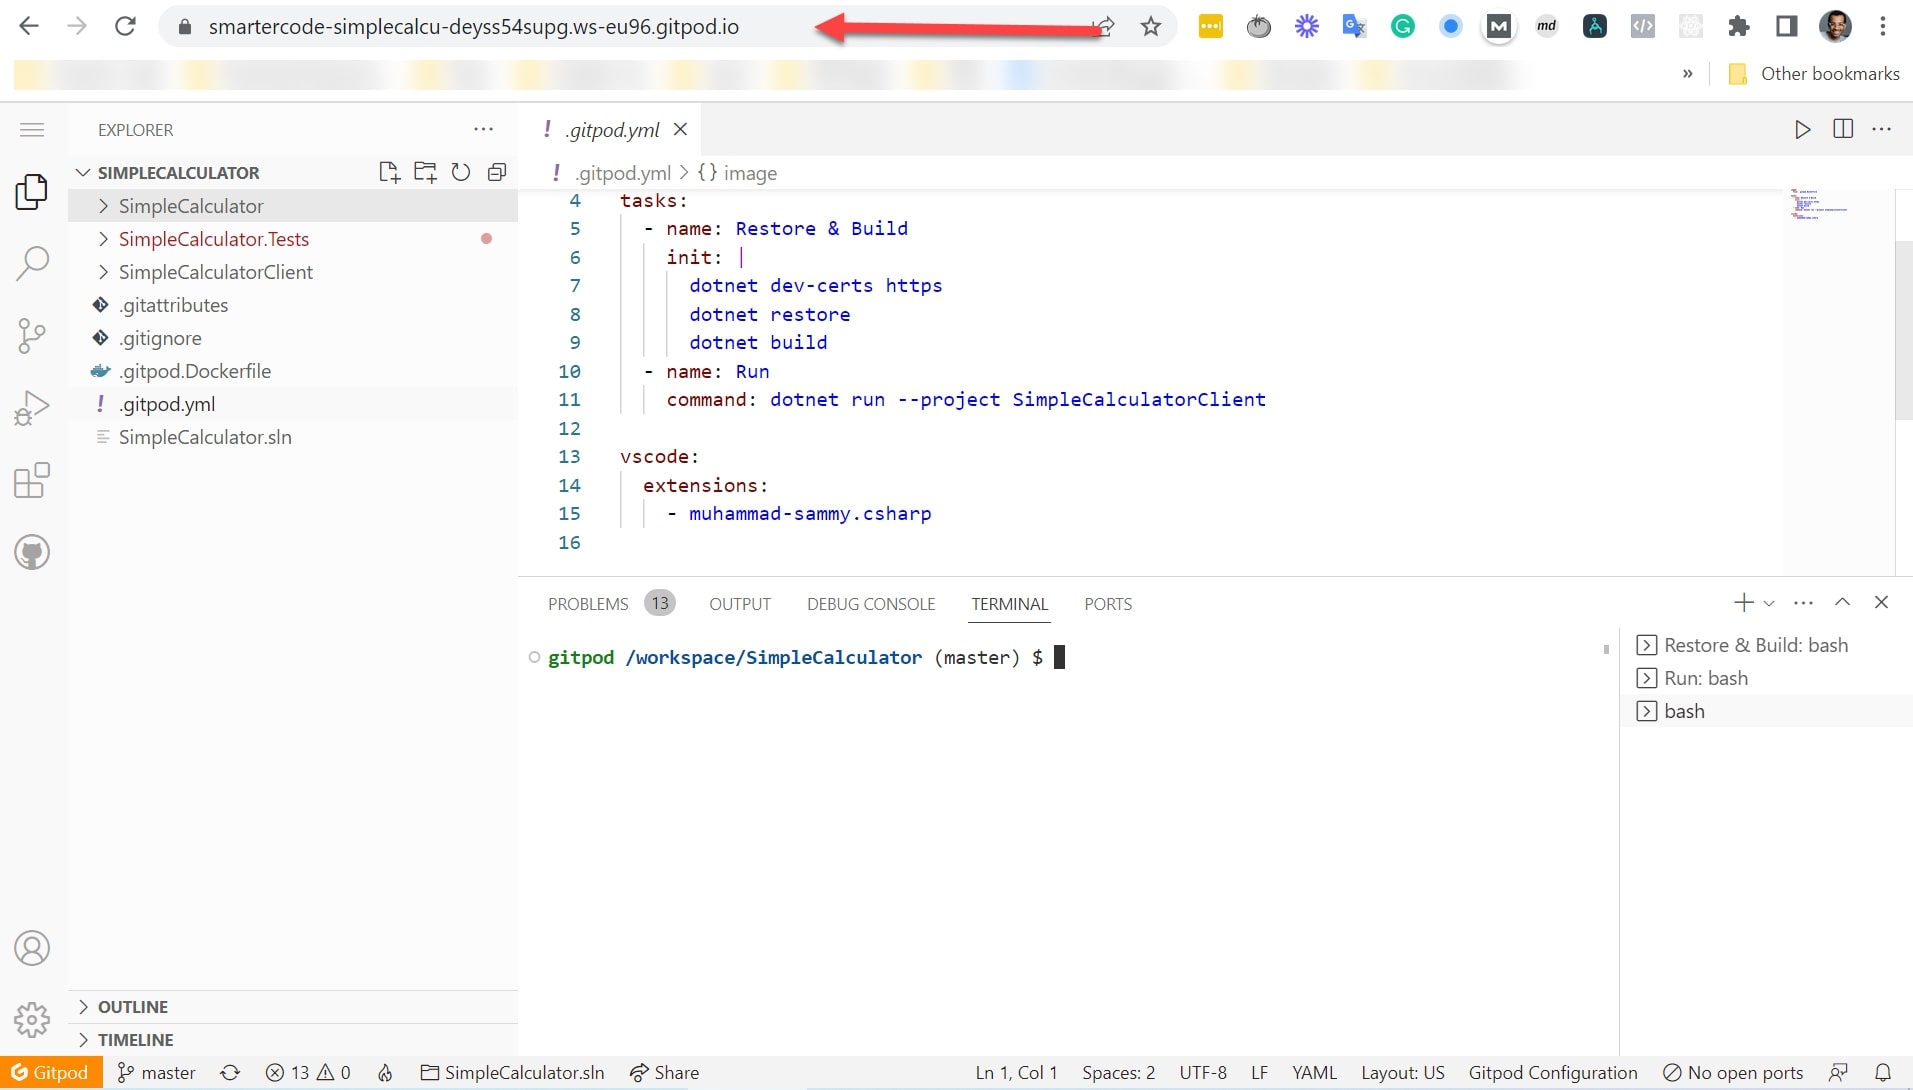
After a few minutes, a Gitpod workspace will launch a new Visual Studio Code IDE that you can use in your browser:
Developing with Gitpod workspace
Now that you've created your Gitpod workspace, you need to make sure that your solution runs successfully.
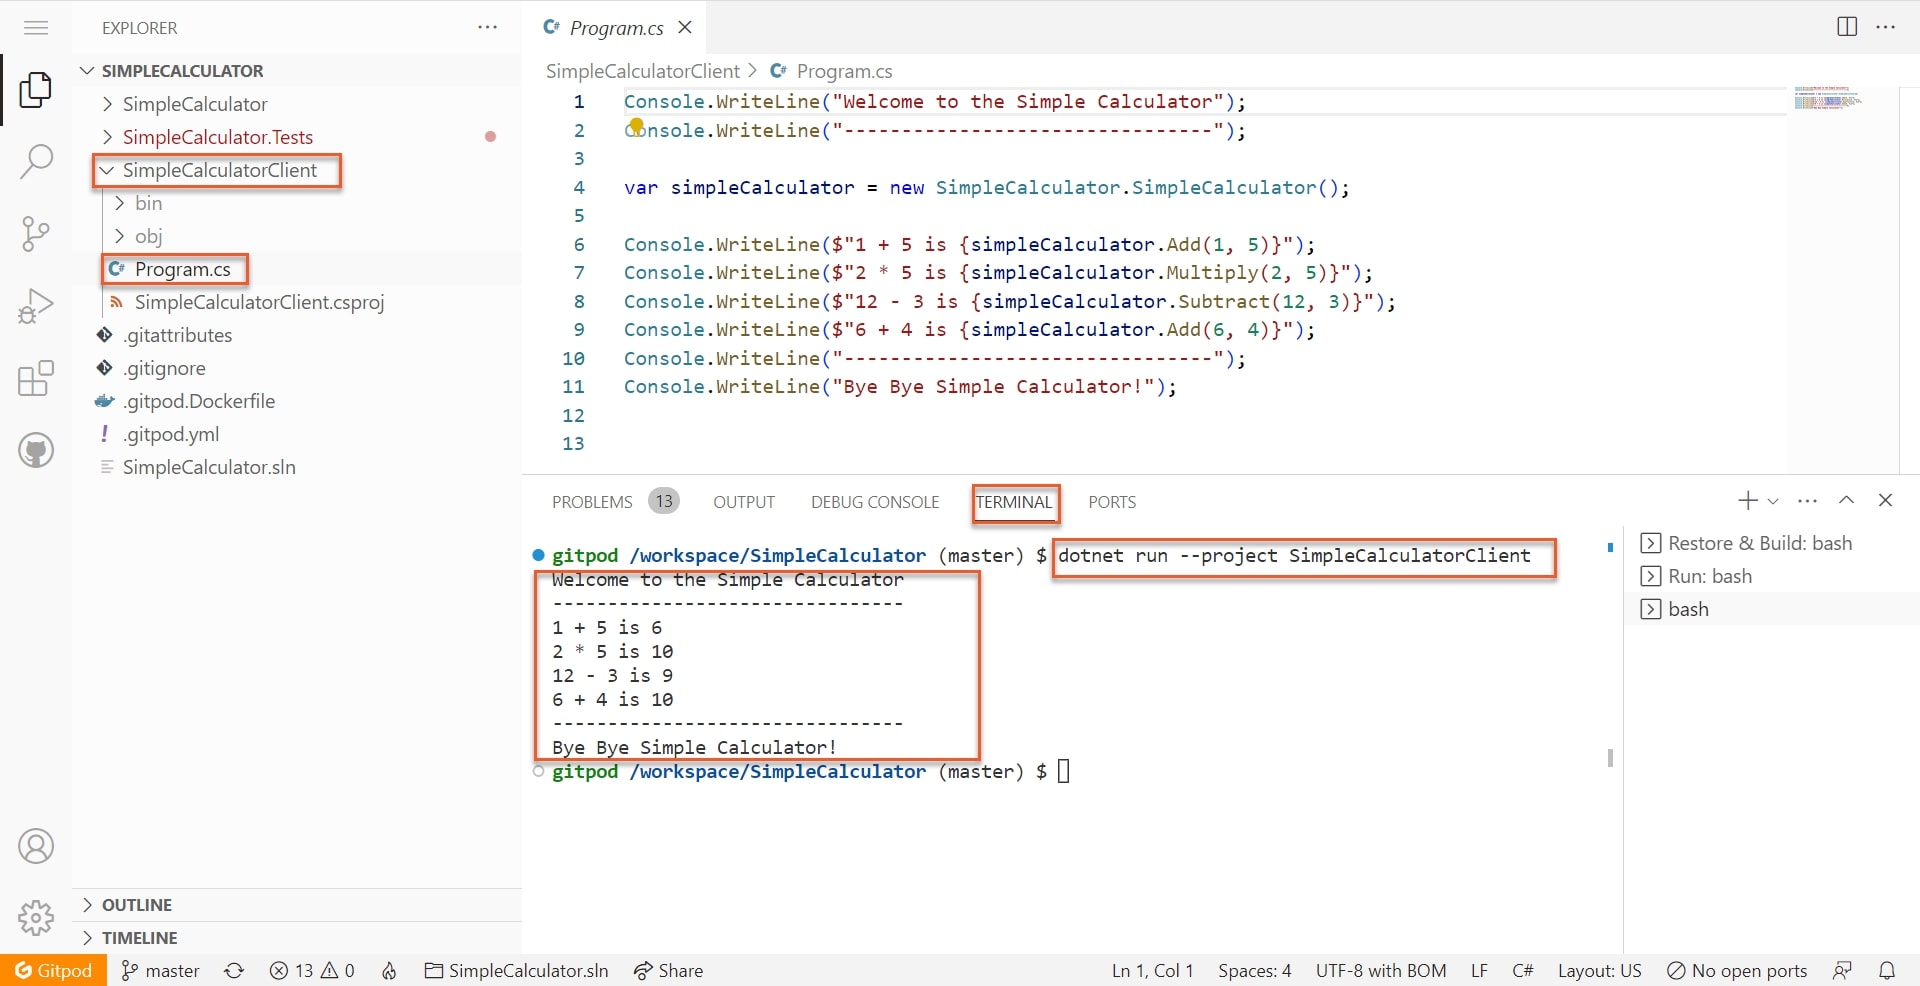
In the GitHub repository, navigate to **Program.cs** under **SimpleCalculatorClient** to find the code you'll execute.
Please note: **Program.cs** represents the entry point in C# projects.
In the terminal, type <span class="p-color-bg">dotnet run --project SimpleCalculatorClient</span> and then select **Enter** to execute. Visual Studio Code will build the project and execute your code:
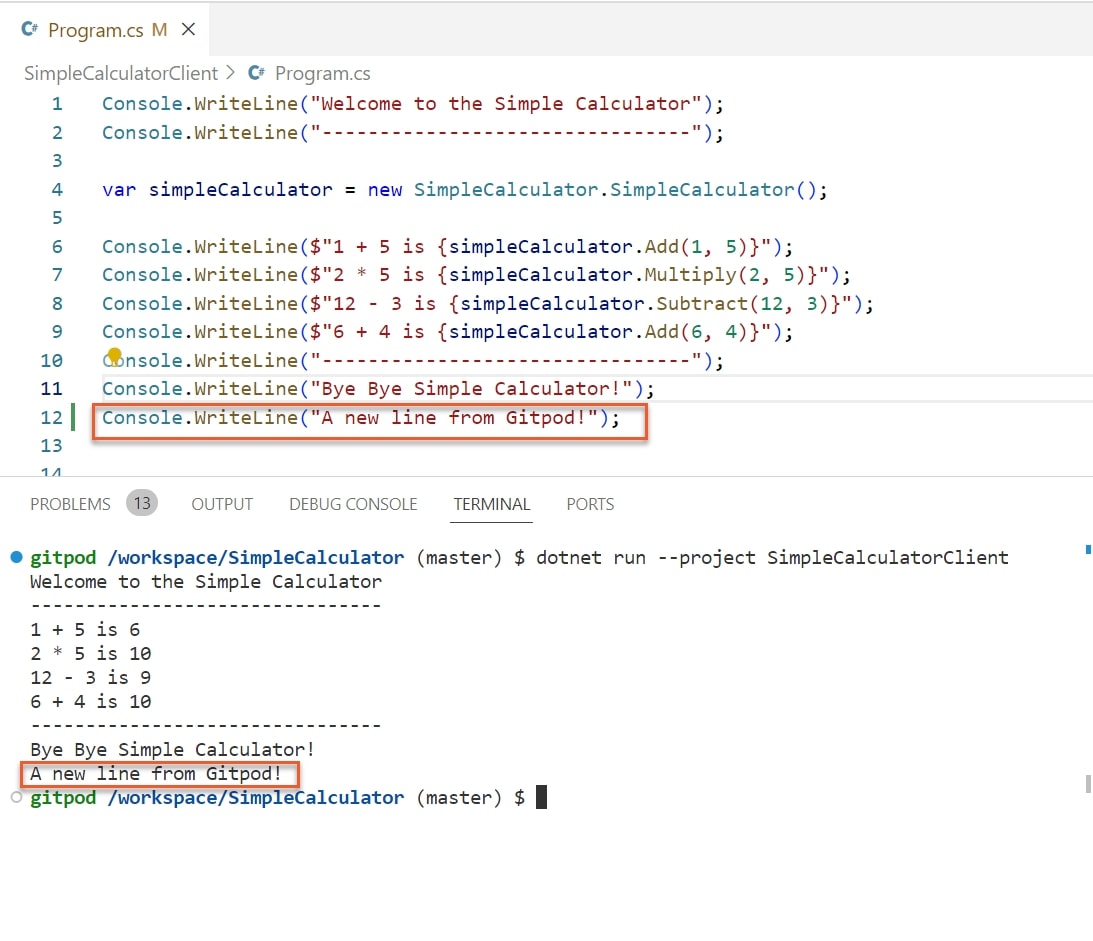
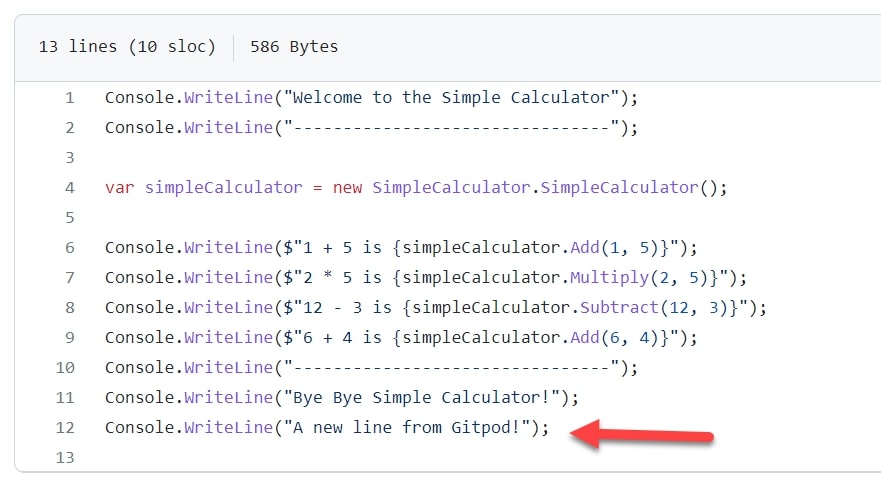
Next, you need to add a simple change and see what happens. In **Program.cs**, add <span class="p-color-bg">Console.WriteLine("A new line from Gitpod!");</span> in the last line. Then type <span class="p-color-bg">dotnet run --project SimpleCalculatorClient</span> in the terminal and hit **Enter**. Verify that the IDE printed your new line:
Commit and push your change to the master branch. Then, click on the source control extension on the left, write a commit message, and click **Commit**. Select **Yes** when prompted:
Please note: The code you write in your Gitpod workspace is not synced to the branch where you created your GitHub forked repository. You'll need to commit it and push it to the corresponding branch just like you do on your local computer.
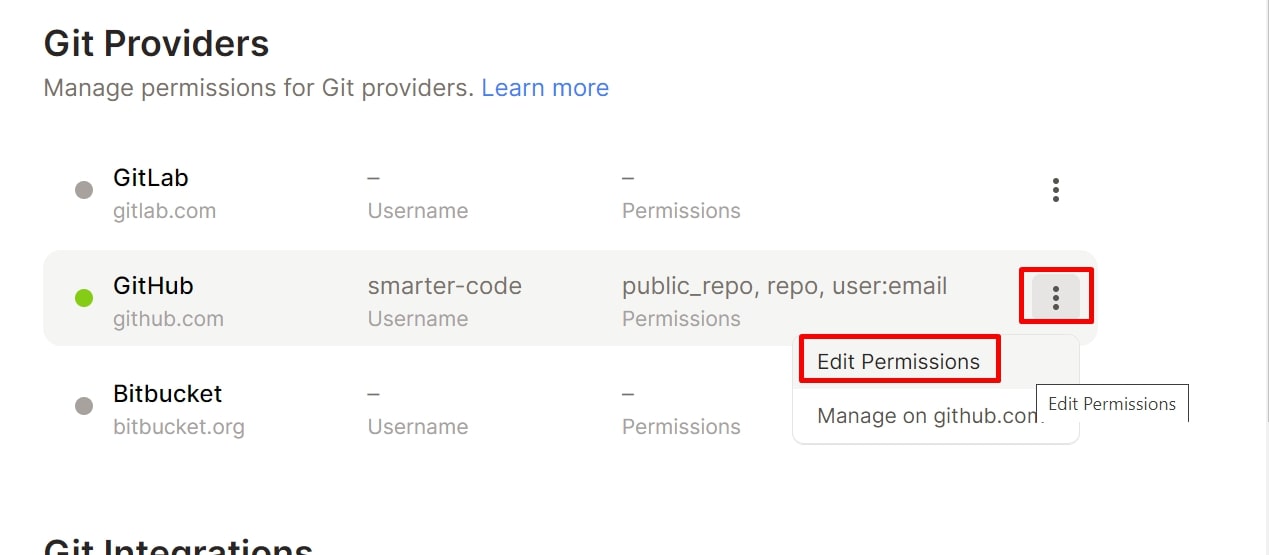
Soon you’ll sync your committed changes to the GitHub repository. However, before doing so, you need to grant Gitpod the necessary permissions. To do that, go to your Gitpod account, click on **Integrations**, and edit the GitHub permissions:
Enable all permissions in Gitpod then click **Update Permissions**:
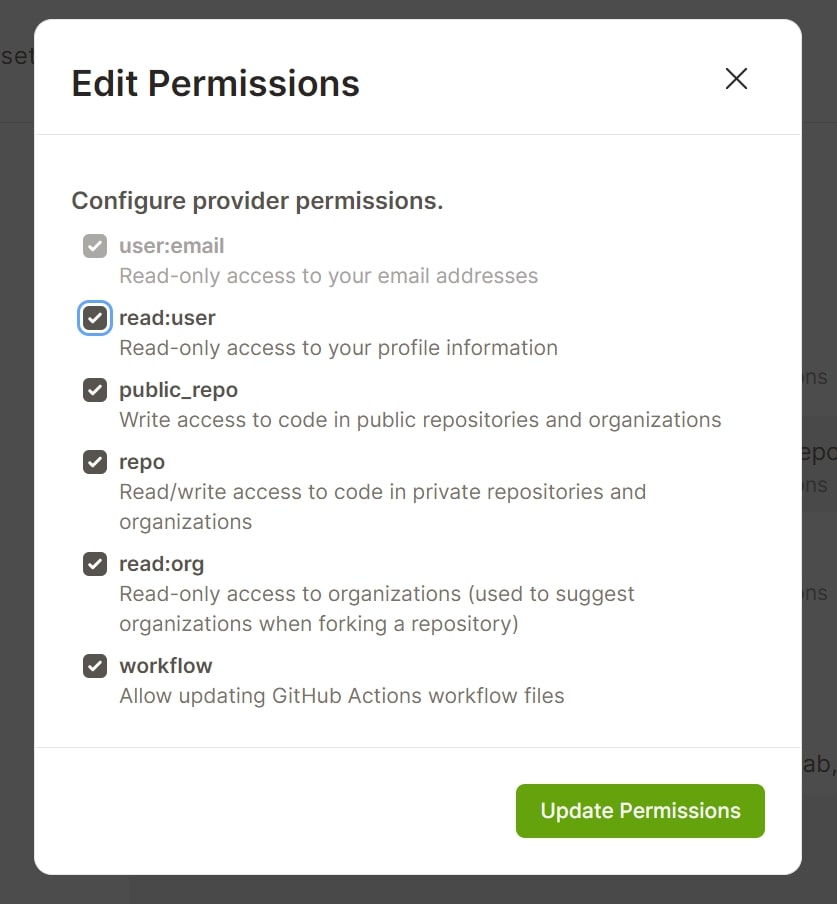
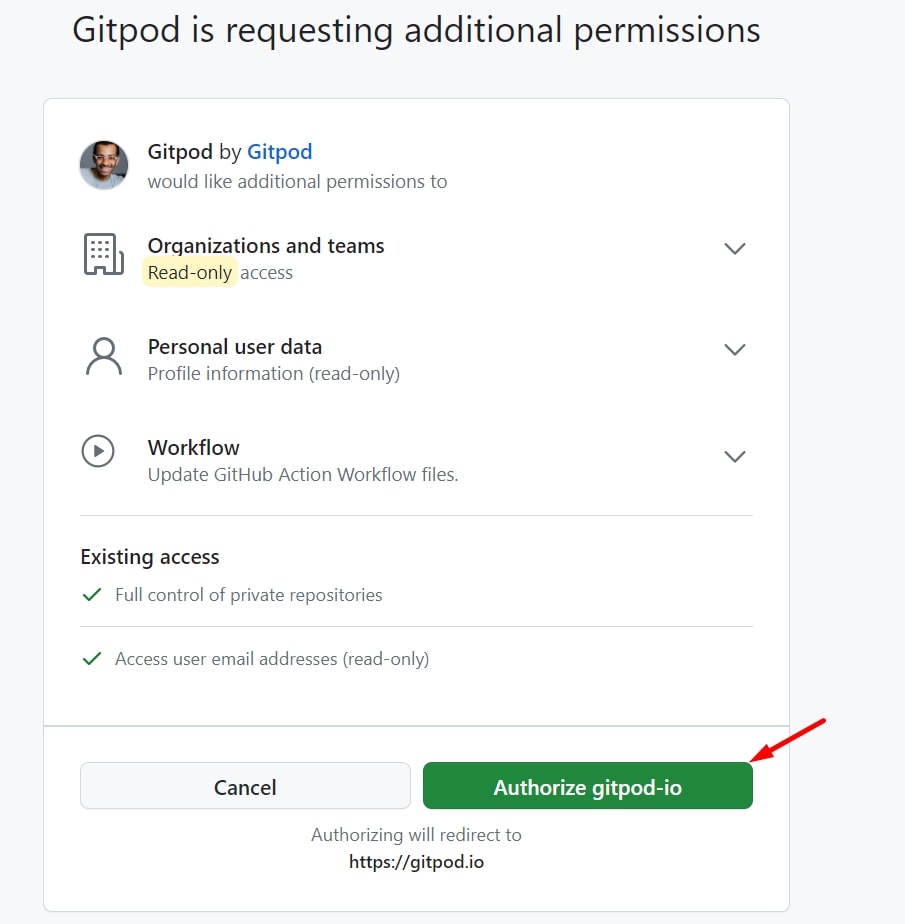
A new browser window will launch and ask you to confirm the permissions. Click on **Authorize gitpod-io**:
Now that you granted the necessary permissions to Gitpod to push to your GitHub account, you can push the committed changes to the master branch by selecting **Sync Changes**. Select **Yes** when prompted.
Then, navigate to **SimpleCalculatorClient/Program.cs** in the master branch of your forked repository and confirm that your workspace pushed the change:
Set up dependencies using the dev container configuration
Since your solution contains a test project, you'll need to run the unit tests using an extension such as the .NET Core Test Explorer in Visual Studio Code. However, the Gitpod workspace's default configuration does not include a testing extension in Visual Studio Code, so you'll need to install it separately.
You can install the extension directly in the Gitpod workspace. However, it won't be installed for other developers who spin up their code in their Gitpod workspace instance. That's why we recommend adding the extension as a configuration for the Gitpod workspace instead.
To configure your Gitpod workspace, you'll work with two files: <span class="p-color-bg">.gitpod.yml</span> and <span class="p-color-bg">gitpod.Dockerfile</span>:
**<span class="p-color-bg">gitpod.yml</span>:** is the primary configuration file for a Gitpod workspace. It defines the environment, tasks, and other settings specific to the project. It can be used to configure:
- Tasks that should run when the workspace starts, such as building the project or starting a development server.
- Workspace settings, like environment variables or port forwarding rules.
- The Docker image you'll use for the workspace, either by specifying a pre-built image or referencing a custom Dockerfile.
**<span class="p-color-bg">gitpod.Dockerfile</span>:** is an optional configuration file used to define a custom Docker image for your Gitpod workspace. A Dockerfile is a script containing instructions to build a Docker image, including the base image, additional tools, libraries, and configurations. If you need to install additional dependencies or software, or configure the environment beyond what's available in the default Gitpod workspace, you can create a <span class="p-color-bg">gitpod.Dockerfile</span>.
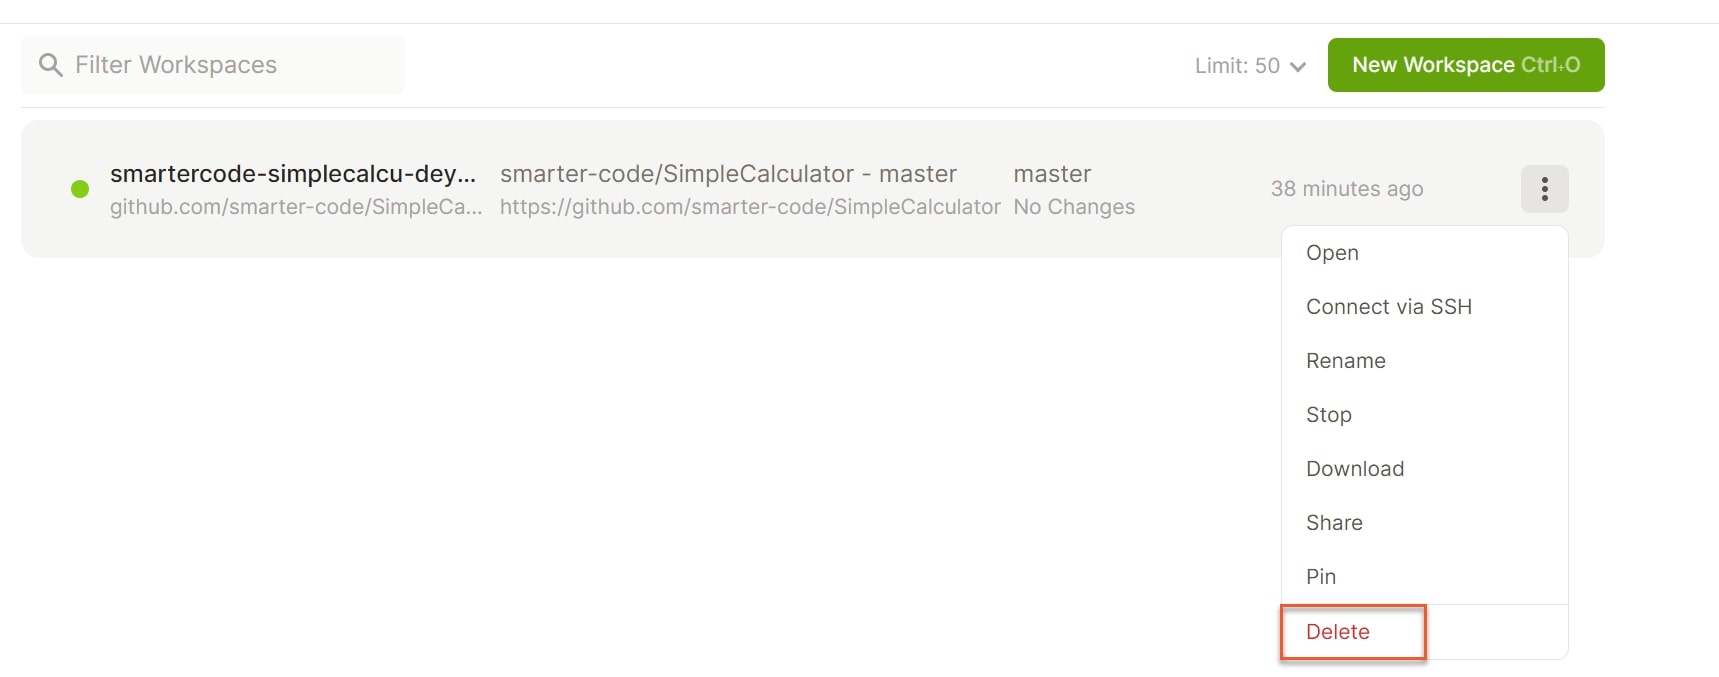
To configure your Gitpod workspace, you'll need to close your current workspace instance window and navigate to the Gitpod home page. Click on **Dashboard** and then the dropdown menu on the right and select **Delete** to delete the existing Gitpod workspace:
Click on **Delete Workspace** to confirm that the workspace was deleted, then head over to your repository and open **.gitpod.yml** and select the **Edit** icon (the pencil). The file content will look like this:

Replace the content of the file with the following:
This content adds the <span class="p-color-bg">formulahendry.dotnet-test-explorer</span> and <span class="p-color-bg">ms-dotnettools.csharp-1.25.4</span> extensions. The first is the test explorer extension and the second is an extension needed to run the test explorer extension. You can learn more about using Visual Studio Code extensions with Gitpod in the official documentation.
The previous YAML file defines the following:
- **<span class="p-color-bg">image</span>:** which is the path for the Docker file containing the Docker image the Gitpod workspace will use.
- **<span class="p-color-bg">tasks</span>:** is a series of tasks the Gitpod workspace will execute when it starts. Here, <span class="p-color-bg">dotnet build</span> is defined to run the tasks.
- **<span class="p-color-bg">vscode</span>:** contains the extra configurations for Visual Studio Code. Here, the C# and test explorer extensions are defined.
You can learn about <span class="p-color-bg">gitpod.yml</span> in the official documentation.
After you've replaced the content of the <span class="p-color-bg">.gitpod.yml</span> file, select **Commit changes**:

Wait a few minutes for your customized workspace to be built, then go to the <span class="p-color-bg">SimpleCalcualtor</span> repository and click on **Gitpod** to create a new Gitpod workspace. This will open a new browser tab to launch the workspace. After Visual Studio Code opens, wait a few seconds for the Test Explorer extension to load:
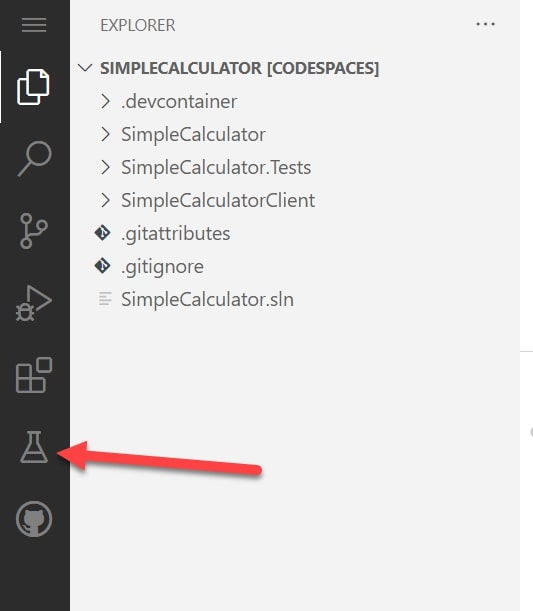
Click on the test explorer icon (as noted in the previous image) to automatically find all your tests in the solution. Then, click on the **Play** icon to run the tests:
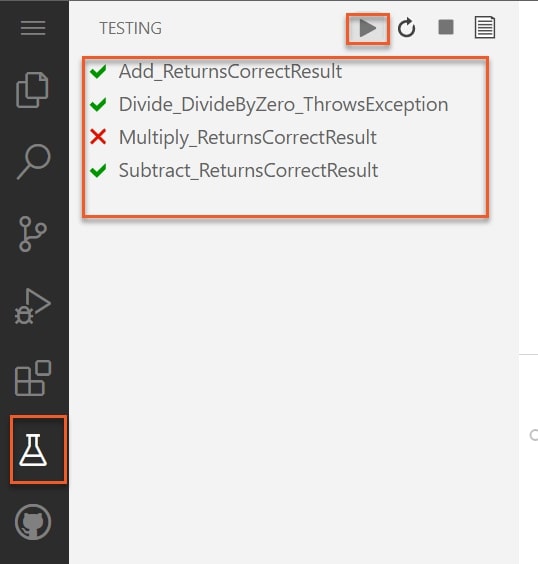
You can see that three tests passed and one failed. Next, you'll learn how to collaborate with a teammate to fix this failing test.
Collaborate with team members
To simulate working with another colleague, you need to create another Gitpod account using a different GitHub account and sign in to it in an incognito browser window.
Please note: We'll refer to the original user you worked with throughout this tutorial as "user A" and the newly created user as "user B" to avoid confusion. You want to invite user B to your GitHub repository to help you fix the failed unit test.
Make sure you're logged into GitHub as user A and navigate to the **SimpleCalculator** repository and click on **Settings > Collaborators > Add people**:
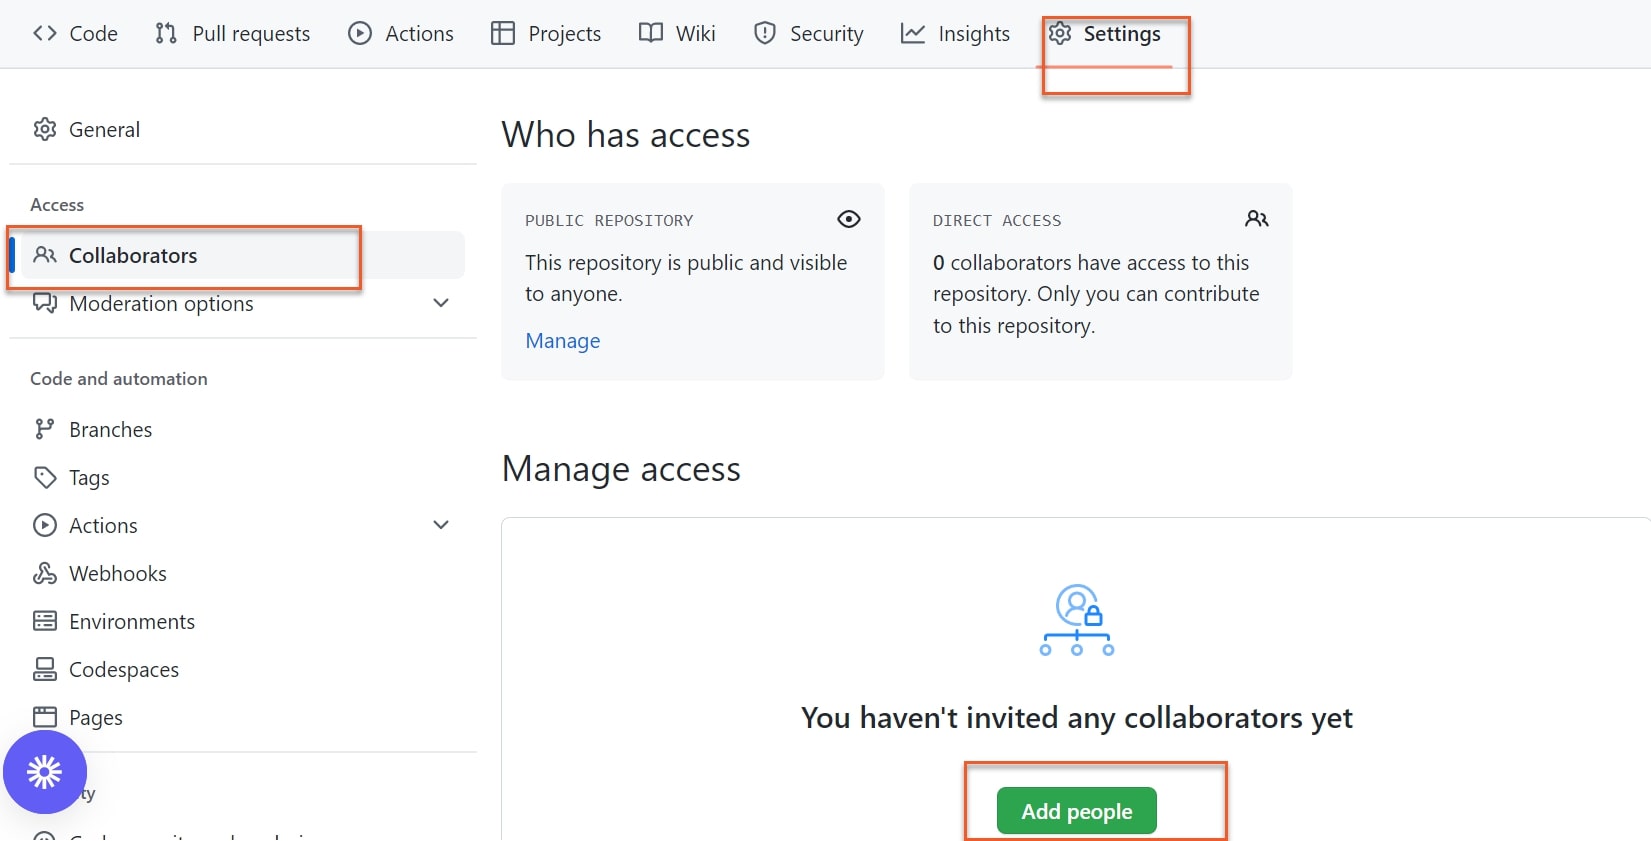
Type user B's username or email and click **Add \<username\> to this repository**. This will invite user B to collaborate in the repository to help you fix your current issue.
To finalize the invitation, you'll need to navigate to the repository using user B's GitHub account and then click on **View invitation**:

Click on **Accept invitation** to start collaborating with user A. Then, go to the **SimpleCalculator** repository and click on **\<\> Gitpod** to create a new Gitpod workspace for user B. This will launch a Gitpod workspace that uses the existing dev container configuration user A previously created.
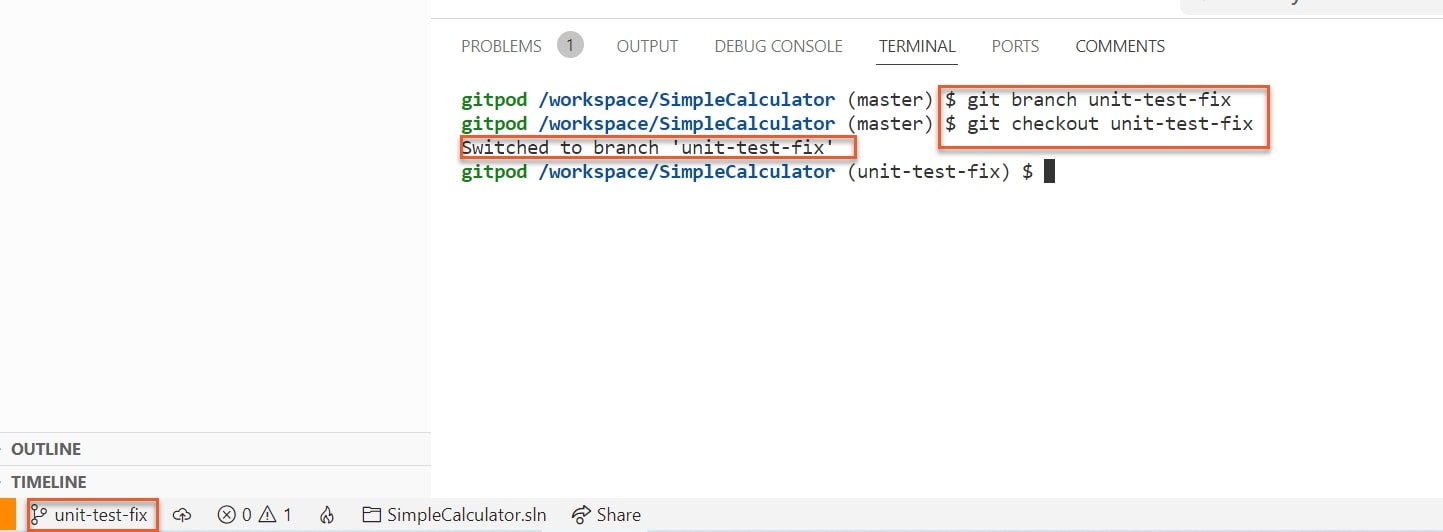
Create a new branch by seleting **Ctrl+Shift+P** to launch the command palette and then search for **> Git: Create Branch** and click on it. You’ll get a prompt to enter the branch name. Enter <span class="p-color-bg">unit-test-fix</span> and hit **Enter**:

A new branch will be created and you’ll be switched to that branch so that you can start working on it:
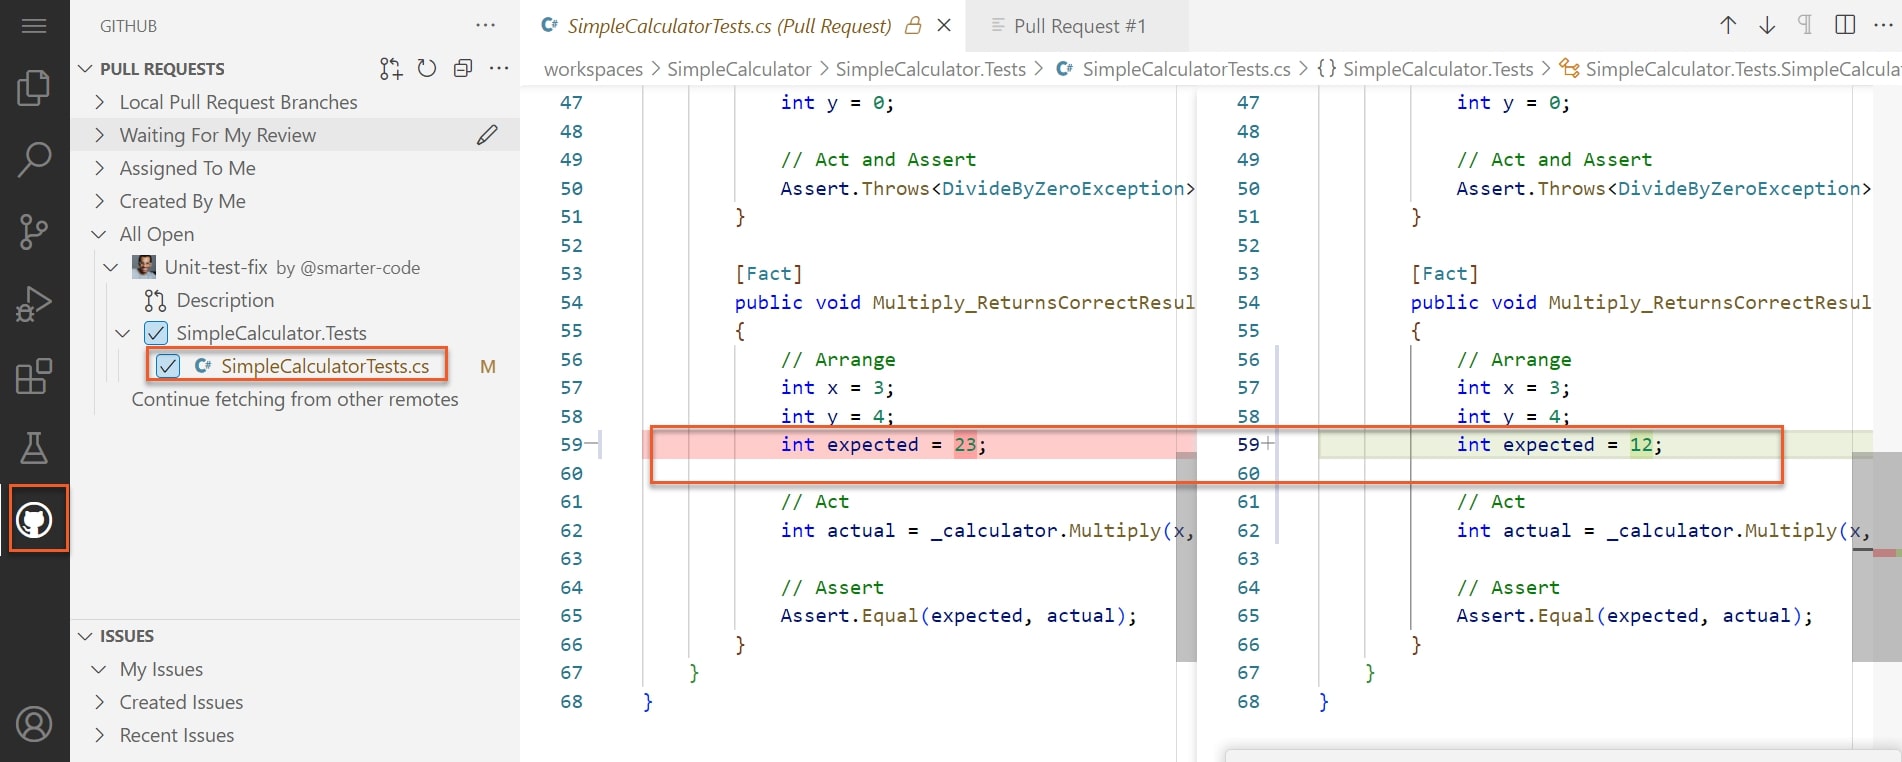
Open **SimpleCalcualtorTests.cs** under **SimpleCalcultor.Tests** and fix the <span class="p-color-bg">Multiply\_ReturnsCorrectResult()</span> method to make the expected result 12 instead of 23:
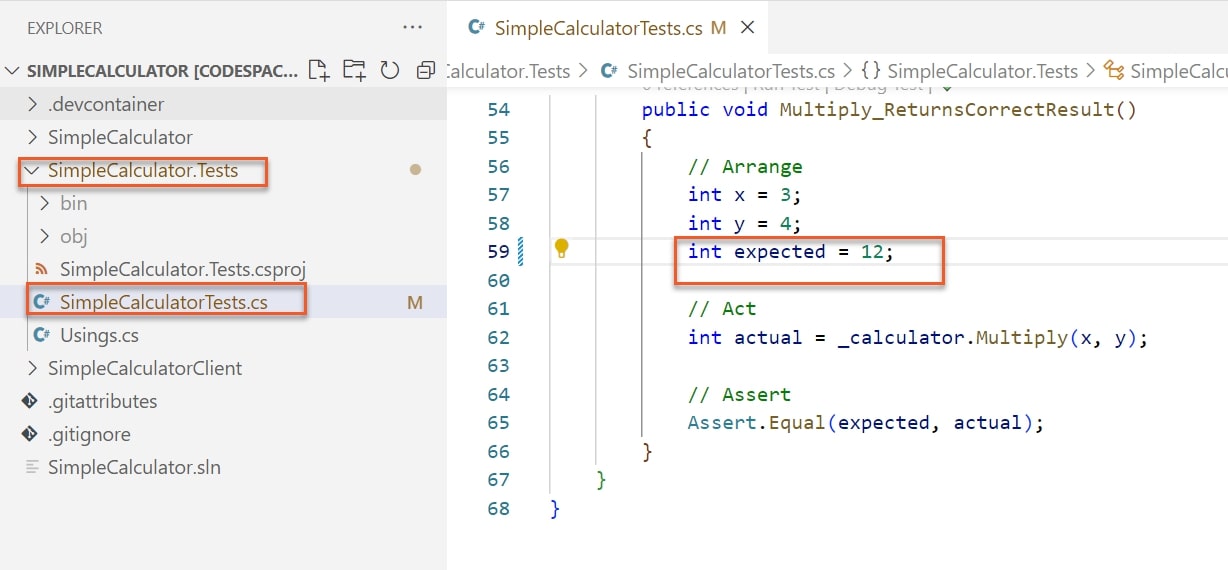
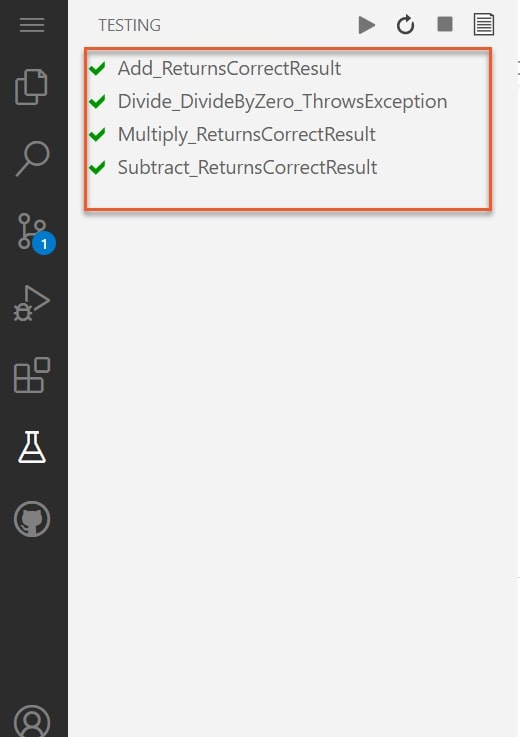
Then, click on the test explorer on the left and execute the unit tests. They should all pass:
Now that all the tests pass, you need to commit your changes to the branch. Type <span class="p-color-bg">git commit -a -m "fix for the multiplication unit test"</span> and hit **Enter**. Then push the changes by typing <span class="p-color-bg">git push --set-upstream origin unit-test-fix</span> and hit **Enter** again.
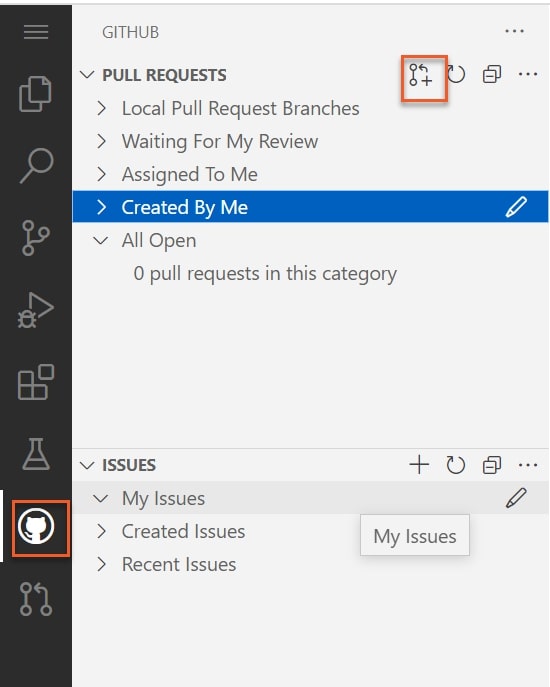
Next, you need to create a pull request from the <span class="p-color-bg">unit-test-fix</span> branch to the <span class="p-color-bg">master</span> branch that user A will review. Click on the **GitHub** icon on the left and then **Create Pull Request**:
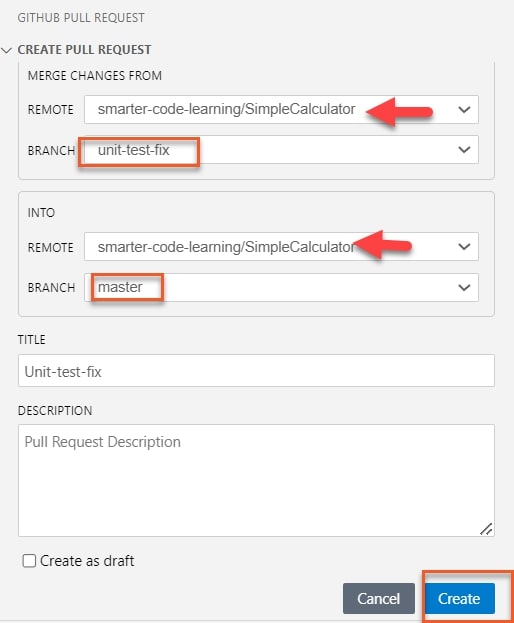
Make sure you merge the changes from the <span class="p-color-bg">unit-test-fix</span> branch to the <span class="p-color-bg">master</span> branch into the same remote branch and then click **Create**:
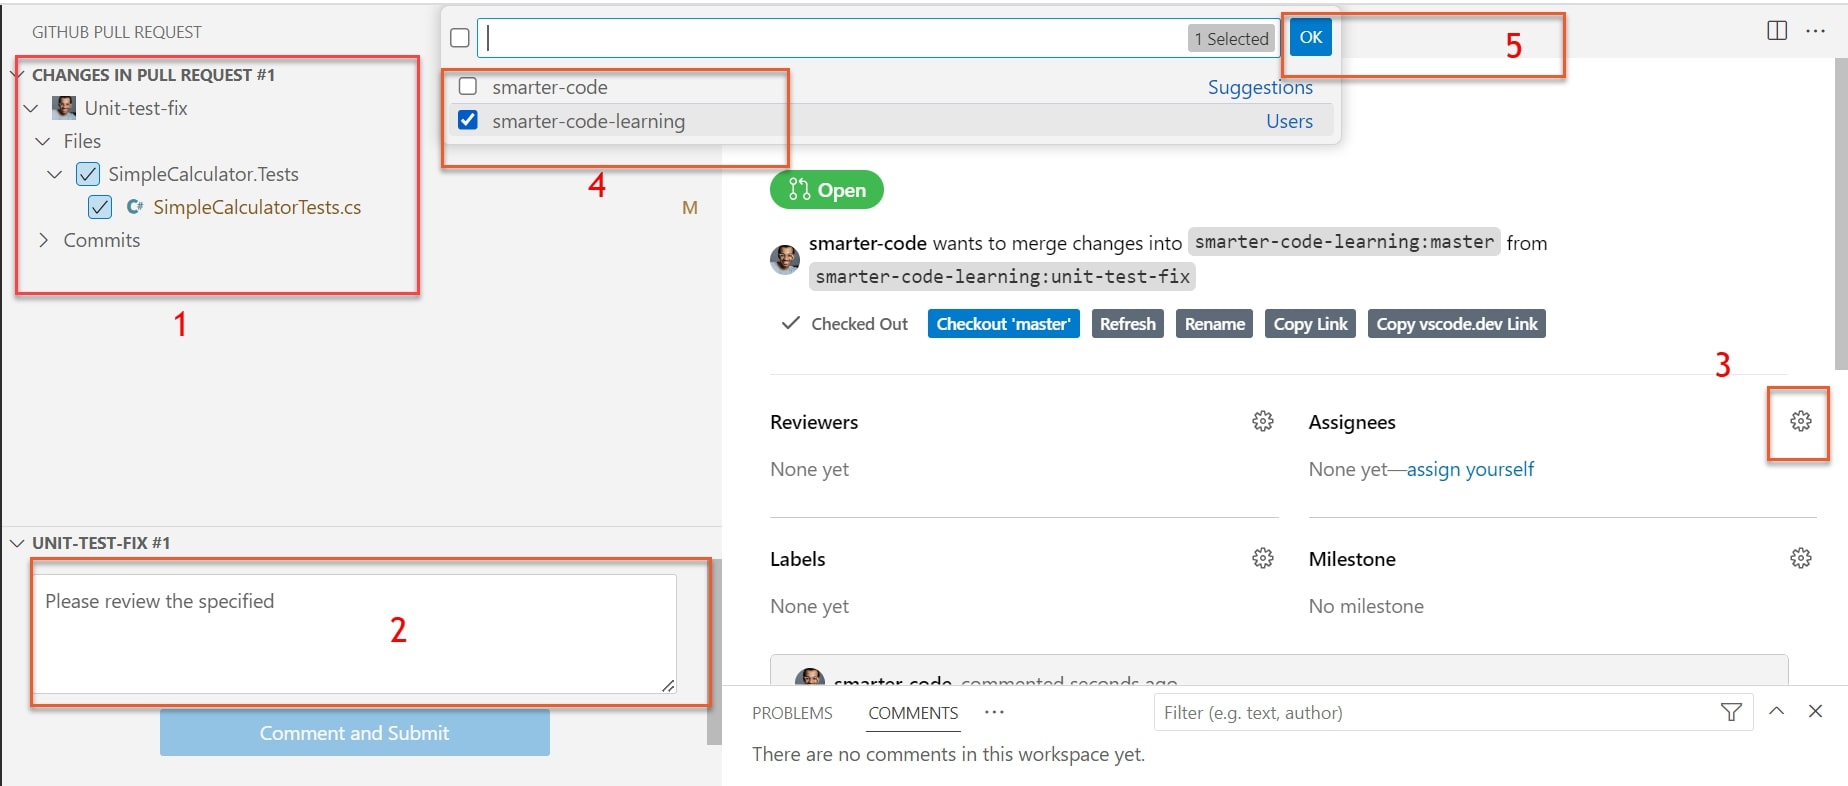
Select user A to review the pull request:
Then, switch to user A's GitHub repository account and approve the pull request. Since you didn't delete your Gitpod workspace, you can relaunch it by clicking on **Gitpod**:
Select the pull requests file to examine the changes user B performed:
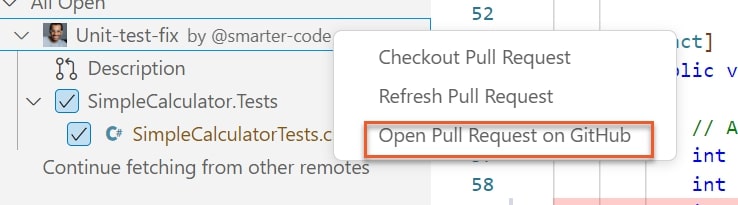
Then, right-click on the pull request branch and click **Open Pull Request on GitHub**:
When the pull request has opened on GitHub, click on **Merge pull request** to merge the changes user B proposed to the master. Then click **Confirm merge**:

> **Note:** You should delete the Gitpod workspace for user B since you no longer need it.
Next, to make your code base more resilient, you'll implement continuous integration to automatically build your code and run your unit tests.
Run one-off builds and tests
To run one-off builds and tests, you'll need to set up GitHub Actions to automate your pipelines. GitHub Actions are workflows that are executed based on specific triggers such as pull requests, code pushes, or opened issues.
GitHub Actions requires a runner to execute, which is the computing environment GitHub Actions uses and can be GitHub hosted or self-hosted.
For the sake of simplicity, in this tutorial, you'll create a GitHub-hosted runner to build and run the unit tests in the SimpleCalculator solution.
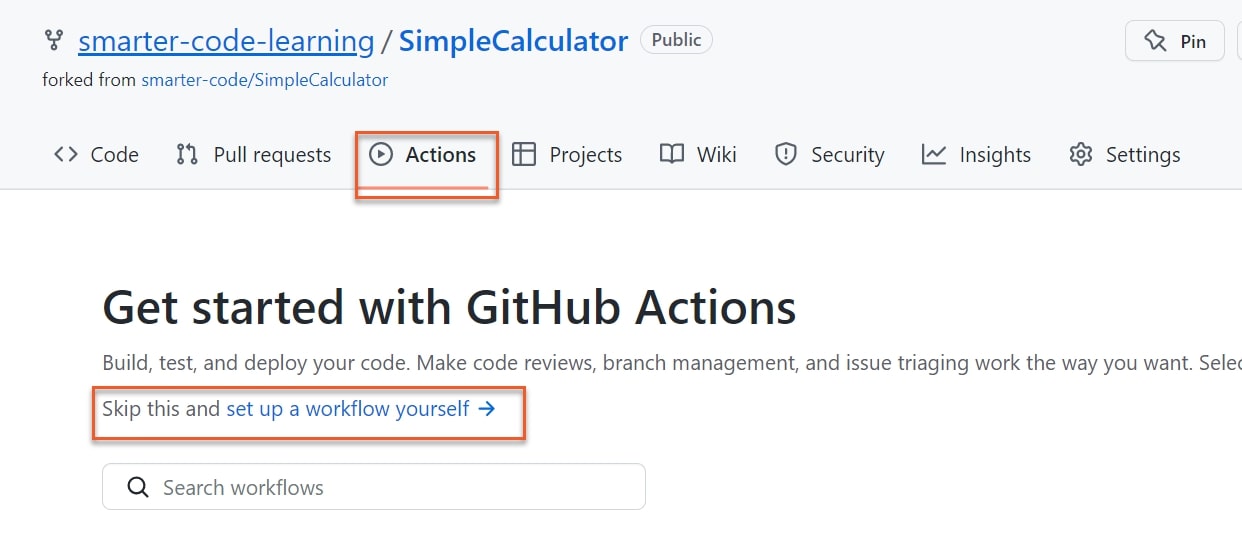
Head over to the <span class="p-color-bg">SimpleCalculator</span> GitHub repository, click **Actions,** and then **Skip this and set up a workflow yourself**:
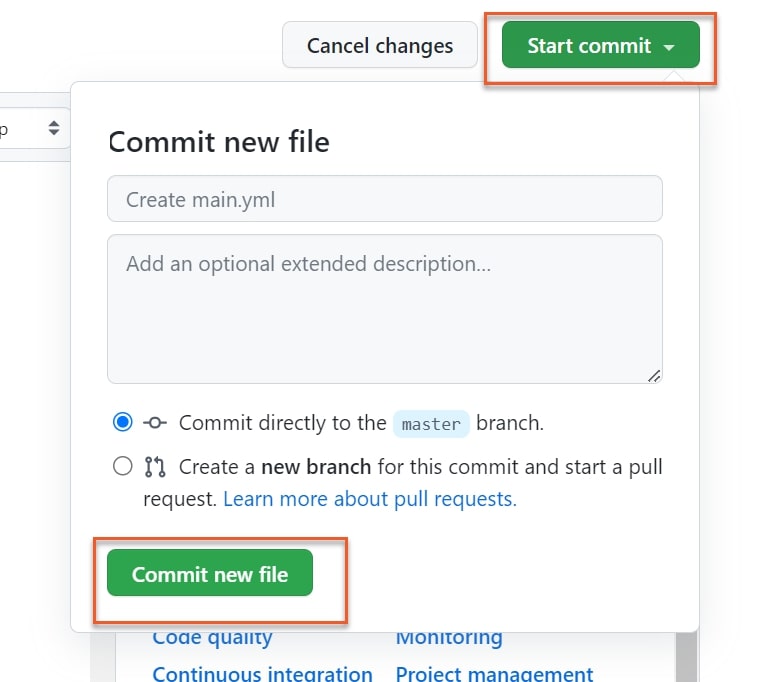
Paste the following code when prompted then click **Start commit > Commit new file**:
Please note: You could also do this through a Gitpod workspace instead of using the GitHub UI.
This will create a new file under <span class="p-color-bg">.github/workflows</span> named <span class="p-color-bg">main.yml</span>. Following is a high-level explanation of each item in the YAML file:
- **<span class="p-color-bg">name</span>:** is the name of the workflow the GitHub runner will execute
- **<span class="p-color-bg">on</span>:** defines the triggers for the workflow. Here they are a push or a pull request to the master branch
- **<span class="p-color-bg">jobs</span>:** represents the jobs the workflow contains. Here, you defined a single-build job
- **<span class="p-color-bg">strategy</span>:** allows you to run multiple instances of the job. In this code, it defines that you would like to run the job under both debug and release configurations
- **<span class="p-color-bg">runs-on</span>:** is the environment the build will run on. Here, you defined a window Docker container
- **<span class="p-color-bg">env</span>:** defines two environment variables that hold the values of the paths of the solution you'd like the build and the unit tests project you'd like to run
- **<span class="p-color-bg">steps</span>:** represents the steps of the workflow. The steps start by checking out the code, installing .NET SDK, installing MSBuild (a build tool for .NET), running the unit tests, and finally restoring and building the application
After committing the new file, click on **Actions** in the repository:
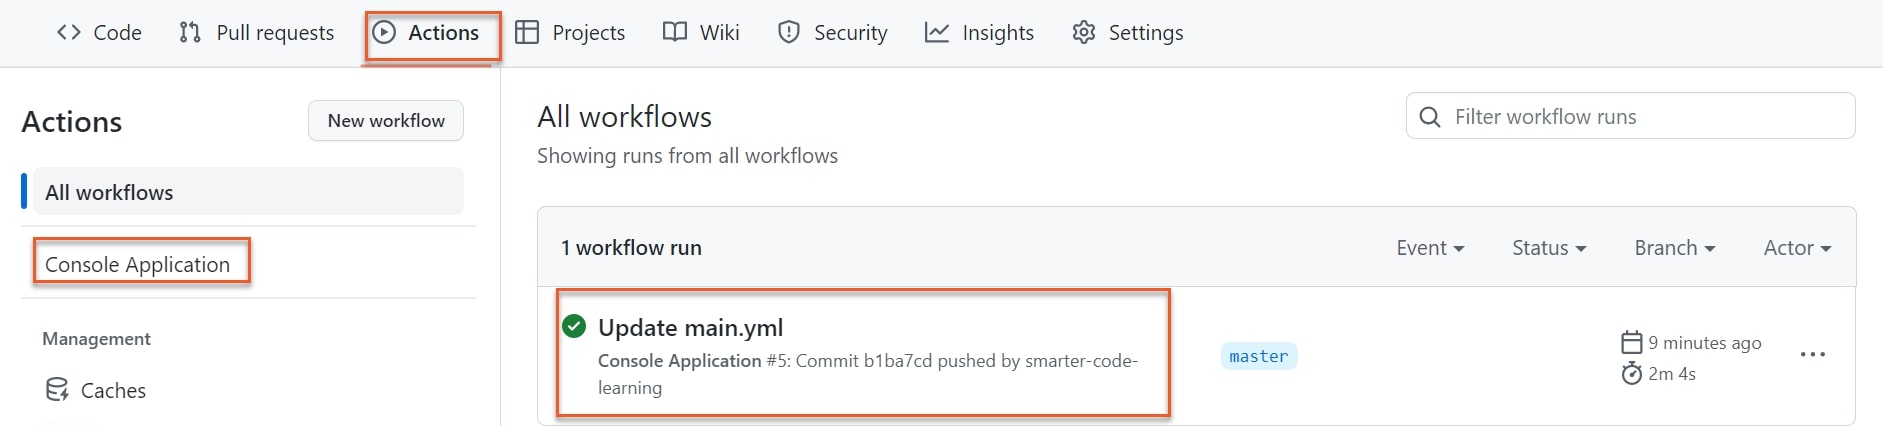
Notice how your workflow (*ie* **Console Application**) is defined on the left. On the right, you can see all the executions of the workflow (it may still be executing for you). GitHub executed the workflow directly when you pushed the <span class="p-color-bg">main.yml</span> file since you defined pushing to master as a trigger for the workflow.
To find out more about the run, click on **Update main.yml**. On the left, you'll see that the run had two jobs: one for debugging and one for release configuration. Click on the **build (Debug)** and scroll down to the bottom to see that the unit tests were executed successfully and that the application was built and restored:
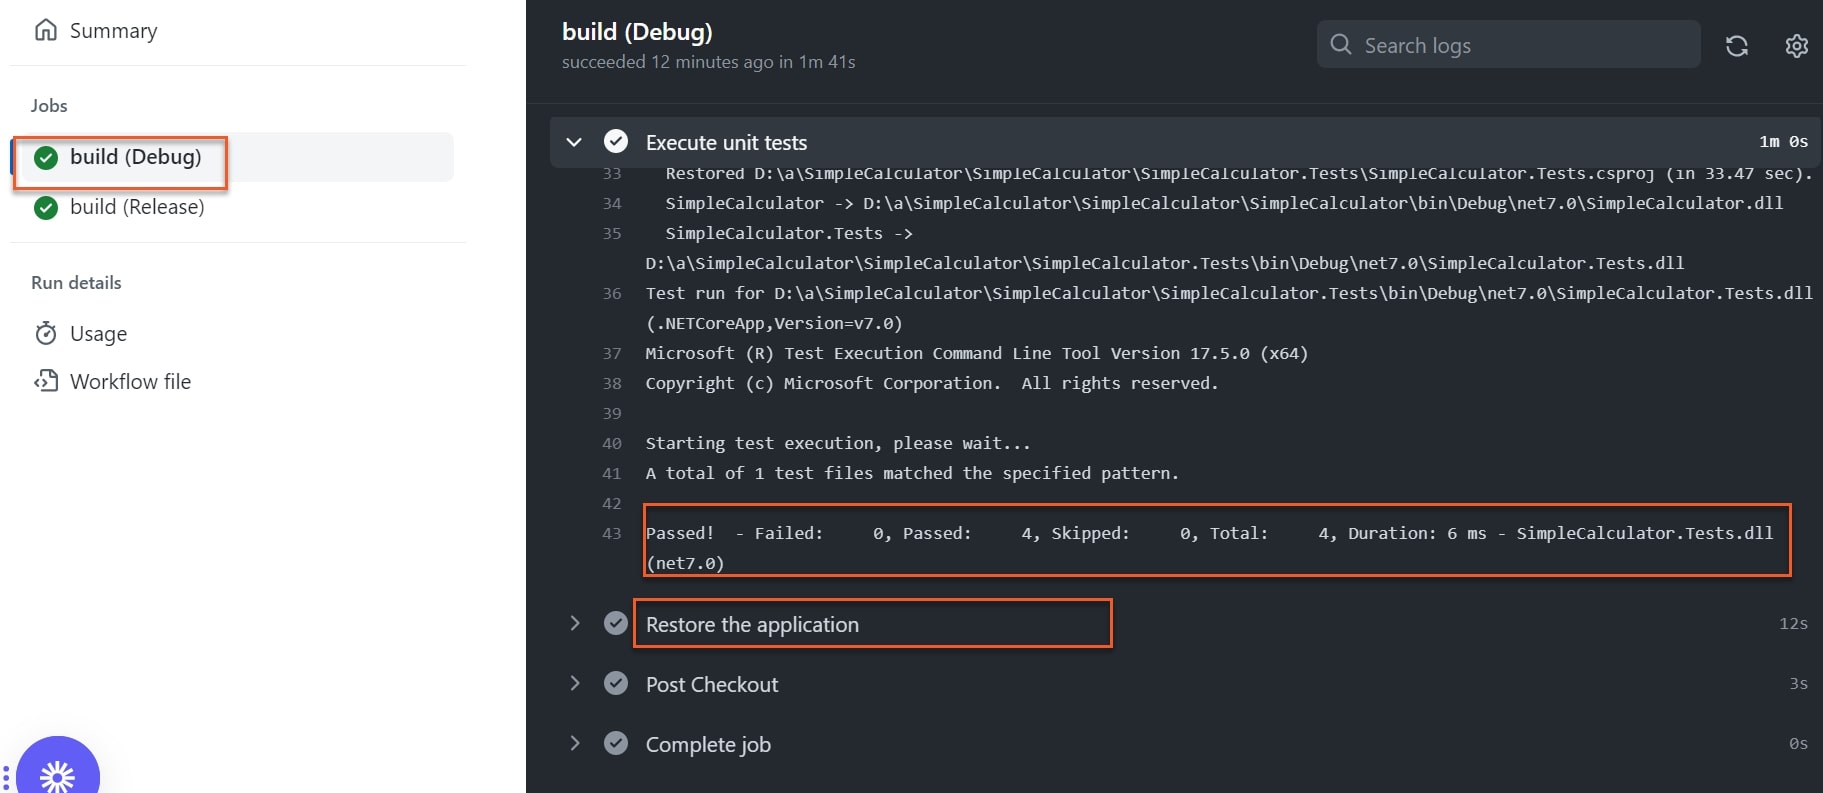
Congratulations! Now you have GitHub Actions that will automatically execute on every push and pull request to the master branch. Moreover, it also attempts to build your code and run your unit tests. This protects against regressions developers may introduce while working on the code base.
Please note: Make sure you remove the Gitpod workspace for user A and user B to avoid losing the free processing power hours that come with your GitHub account.
Conclusion
In this post, you learned how cloud dev environments enable developers to quickly spin up a development environment from an existing configuration. You also learned what benefits they bring, such as improved developer experience, scalability, and cost savings.
Then, you learned how to use Gitpod which is a cloud dev environment. You applied several scenarios using the Gitpod workspaces, such as creating a new workspace from GitHub, working with the code, and configuring the workspace. Moreover, you learned how to collaborate with other developers and configure continuous integration to verify builds and tests.
Finally, the article concluded by mentioning some of the drawbacks of the cloud dev environment, such as the dependency on the internet, the potential complexity of the initial setup, and the vendor lock-in issue.
If you plan to implement your cloud dev environment, try Garden. Garden enables you to build, deploy and test your entire system with a single command in a production-like environment.