


In part I of this series about the importance of production-like dev environments and how to manage them, I discussed the importance of minimizing the gap between production and dev environments. In part II, I want to show you how to achieve that with Garden and stay on top of managing multiple environments without lots of glue code or overly complex CI pipelines.
Meet environments in Garden
For those of you who haven’t heard about Garden before, Garden combines rapid development, testing, and DevOps automation in one tool. Environments are a Garden built-in and can be used to define different deployment targets, inputs, build methods and much more. Let’s take a look at this <span class="p-color-bg">project.garden.yaml</span> which is the main configuration file used by Garden. This is not a complete project configuration yet, but we will get there bit by bit.
First, you can see we have defined a project called my-project and we’ve also defined 5 different environments local, dev, ci, preview and prod. We can also see two providers: local-kubernetes and kubernetes. Providers in Garden can also be Pulumi or Terraform, so we aren’t limited to deploying to Kubernetes. In this example we will stick with Kubernetes. Note that we will use different Kubernetes clusters for different environments.
So let’s move to the next section and define our providers a bit more specifically.
Configuring different deployment targets for environments
Now we have added a little bit more detail to our providers section. For the kubernetes providers we have specified a kubernetes context. We could also specify a kubeconfig here, but in this case we rely on the default <span class="p-color-bg">~/.kube/config</span>. We have also defined the environments that we want to use with each provider, which means the dev, ci and preview environments will be deployed to a different kubernetes cluster than the prod environment.
The local-kubernetes provider will be used to deploy the <span class="p-color-bg">local</span> environment to your local kubernetes solution of choice like minikube or docker-desktop. The difference between the local-kubernetes and the kubernetes provider is that the local-kubernetes provider will install an ingress controller based on the local kubernetes solution and discover the kube context of your local kubernetes cluster (this behaviour can be disabled).
You can also see that we added a <span class="p-color-bg">defaultHostname</span> which will be used for ingress if not specified differently in manifests. We have also added a <span class="p-color-bg">namespace</span> stanza to specify the Kubernetes namespace to deploy to.
Template namespaces and hostnames
In the last section we hardcoded namespaces and hostnames, but if we are using a shared remote Kubernetes cluster for dev, ci and preview we will have collisions pretty soon. So in this section we are adding some templating around namespaces and hostnames.
We start by defining a few project wide variables with names that can be used for the environments. For the CI environment we rely on an environment variable <span class="p-color-bg">BUILD_NUMBER</span> in a ci runner. This variable will differ based on your CI provider, but every CI provider has a similar variable. We do the same for the preview environment: Here we are using the pull request number from a local environment variable available on GitHub actions for example. This might also be different in your CI provider. For the dev environment we just use the local username on your laptop.
In the environments section we are using the above defined variables to define the Kubernetes namespaces to deploy to. For example my username on my laptop is <span class="p-color-bg">anna</span> which will result in my dev environment namespace being called <span class="p-color-bg">my-project-anna</span>. Let’s hope there aren’t more <span class="p-color-bg">annas</span> in my team 😉.
We also use the variables to define hostnames for our ingress. This way each dev, ci or preview environment can have it’s own ingress and a link to the application can be shared with colleagues or other teams like QA. This, of course, is one of the great benefits of using remote dev environments. When your colleagues review your PRs they can simply take a look at the application running in the preview environment. Or think about pairing and accessing the application you are working on remotely with code changes synced on the go.
Finally, in the provider section we pass down the variables to the providers. Depending on which development I deploy to, the values from the respective environment section will be used. If I deploy with <span class="p-color-bg">garden deploy --env=dev</span> my application will be reachable on my-project-anna.dev.my-company.com.
Deploy some apps
Now that we have taken care of managing all these different environments and their deployment targets in a concise way, we want to actually deploy something in there and see how we can make our dev environment as close to the production environment as possible.
Meet Garden Modules
A module in Garden usually represents one service in the application. Garden supports several types of modules:
- container: used to build container images and also supports deploying them to Kubernetes with a simplified syntax that does not have feature parity with actual Kubernetes manifests.
- kubernetes: used to deploy with Kubernetes manifests.
- helm: used to deploy with helm.
- terraform: used to deploy a terraform stack.
- pulumi: used to deploy a pulumi stack.
- exec: run scripts - very useful to add a bit of the glue code sometimes necessary to load data or fetch a token. This is also very useful for local development workflows where you want to develop and test a service without running it in a container. You can easily reuse shared environment variables and weave locally running services into an environment with some services running in Kubernetes.
Each module additionally supports tasks and tests, which means you can specify how to run your tests for each service in the module or run all of them with <span class="p-color-bg">garden test</span>. Tasks can be used to specify additional commands for that module to be run before or after a deploy. Things that our team likes to put in tasks are for example seeding a dev database or clearing it. Tasks can also be run individually.
Let’s lean back and digest what we’ve learned about modules so far. We can use them to build container images (or potentially other artifacts with the exec module) and we can use existing production manifests to deploy those. We can also run our tests and we glue it all together with some script steps.
The how and when something is run is actually determined by a graph algorithm — we call it the stack graph.
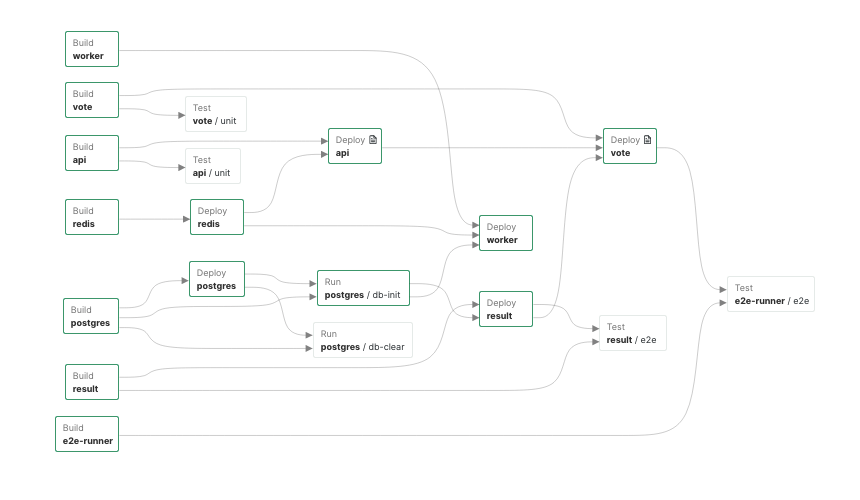
The stack graph is automatically computed by Garden based on your project and modules configuration. For a full example of how this works checkout this example that deploys a voting application. Each directory in this example contains a module with either the code and Dockerfile for a microservice or it contains additional tools like a postgres database.
If you want to learn more about the stack graph and how tests and tasks fit into the picture take a look at this overview of how Garden works. And if you just want to get hands-on and try out Garden for yourself check-out our 5 minute quickstart guide.
Conclusion
Thank you so much for sticking with me for this two part blog series on the importance of production like dev environments. If you missed it, here is part I, an explanation of why our dev environments need to be closer together 🙂.
In part I, we have seen the roles different deployment environments play, how they are typically used and why the dev environment should not be so far apart from the production environment.In part II we looked at a way to manage different deployment environments more flexibly with Garden while maintaining a clear separation between them. Furthermore we have seen how we can re-use our production manifests and enhance them with the capabilities to run custom tasks and tests. This framework allows us to bridge the gap between development environments and production environments.
I am curious about how you manage the deployment environments in your stack. Happy to discuss in our discord forum!