


In a previous blog post, I described an end-to-end development workflow on Kubernetes.
In this guide, we’ll see it in action:
We’re going to provision a Google Kubernetes Engine (GKE) cluster and a Cloud SQL database, and set up a development and staging environment in just a handful of commands, using Garden.
Garden is a developer tool that automates your workflows and makes developing and testing Kubernetes applications faster and easier than ever.
For those who don’t want to read through the post, here’s a video that shows the entire process.
From Scratch
In what follows, we’ll:
- Create a GKE cluster from scratch, using Garden’s Terraform plugin.
- Deploy the application to our development namespace in the cluster, alongside a development database that we can easily spin up and tear back down.
- Get a feel for what it’s like to develop against a remote cluster (it’s fast!).
- See how we can easily run integration tests as we develop, now that our environment is fully remote.
- Provision a persistent Cloud SQL database for our staging environment (again using Terraform) and deploy our app there.
Note that we took a few shortcuts to limit the scope of this blog post:
- An environment is really just a namespace in the cluster, and everything is under the same GCP project. The recommended approach is to have an individual GCP project per environment.
- We store the Terraform state locally and auto apply the stack when initialising the cluster. The recommended approach is to store the state remotely and turn auto-apply off.
- We’re not using TLS certificates to secure our ingresses. See here for setting up TLS in a Garden project.
You’ll find the project source code here.
Project Structure
The app itself is very simple. It contains a single backend service written in Node.js that fetches an entry from a database table.
We also have two database modules:
- a Postgres Helm chart that we deploy in the development environment
- a persistent Cloud SQL database that we provision via Terraform for our staging environment.
It looks something like this:
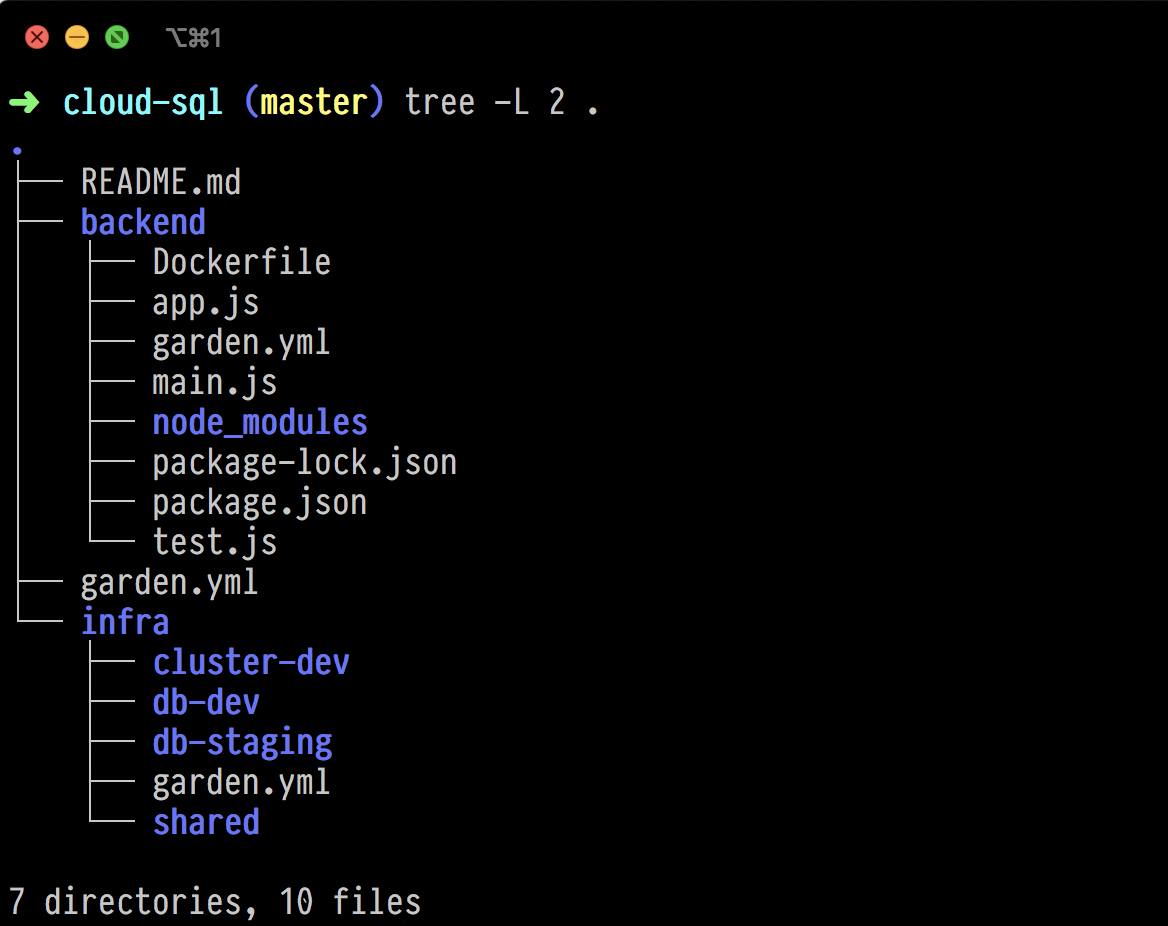
The <span class="p-color-bg">db-dev</span> directory contains the Garden module for the Postgres Helm chart.
The <span class="p-color-bg">cluster-dev</span> and <span class="p-color-bg">db-staging</span> directories contain the entrypoints to the GKE and the Cloud SQL Terraform modules respectively. The modules themselves are in the <span class="p-color-bg">shared</span> directory.
To keep things simple, we deploy the <span class="p-color-bg">staging</span> environment to the <span class="p-color-bg">dev</span> cluster. That's why there's currently no <span class="p-color-bg">cluster-staging</span> directory. But we've set things up in such a way that you can easily add more environments which still re-use the same shared modules. For example <span class="p-color-bg">cluster-staging</span> and <span class="p-color-bg">cluster-prod</span>, and <span class="p-color-bg">db-prod</span>.
Before You Start
Step 1— Install Garden
You need to have Garden installed to follow this guide. You can get the latest version from our GitHub release page. You’ll also find a more detailed installation guide here.
Note that you don’t need to have Kubernetes or Docker installed.
Step 2— Install the Google Cloud SDK and authenticate
You will also need to have access to the Google Cloud Platform. If you’re a first time user, you can follow that link and get a $300 credit for free (as of March 2020).
Once you have a GCP account, you’ll need to install the <span class="p-color-bg">gcloud</span> command line tool (if you haven't already). Follow the instructions here to install it, and authenticate with GCP:
Step 3— Set up a GCP project
Choose a project ID for this project and run the following (skip individual steps as appropriate):
Deploying the Application
With <span class="p-color-bg">gcloud</span> installed and a GCP project set up, it's time to get down to business.
Step 1 — Clone the project and replace the default variables
First, clone the repo and change into the project directory:
Next, replace the default variables in the project level <span class="p-color-bg">garden.yml</span> file. You will need to set your own GCP project ID in the <span class="p-color-bg">gcp_project_id</span> field under the <span class="p-color-bg">variables</span> key.
Step 2 — Initialize the cluster
Now we can initialize the cluster with:
This will trigger a few things:
First, the <span class="p-color-bg">terraform</span> provider will apply the stack that the <span class="p-color-bg">initRoot</span> field in the project level <span class="p-color-bg">garden.yml</span> points to. In this case, it's the <span class="p-color-bg">./infra/cluster-dev</span> directory. We add the value for the <span class="p-color-bg">initRoot</span> field via a template string so that we can easily add more environments to this project:
Terraform init root
The Terraform provider defines a <span class="p-color-bg">kubeconfig.yaml</span> output that the <span class="p-color-bg">kubernetes</span> provider consumes, via:
Kubeconfig path
This is how Garden knows to deploy the stack to that particular cluster.
Next, the <span class="p-color-bg">kubernetes</span> provider will install the system services to the <span class="p-color-bg">garden-system</span> namespace.
In this project, we have <span class="p-color-bg">buildMode</span> set to <span class="p-color-bg">cluster-docker</span>. This means that Garden will build all your images in-cluster, so that all the hard work happens there, not on your laptop.
This whole process can take a few minutes.
Step 3 — Start developing!
In the project level <span class="p-color-bg">garden.yml file</span>, we've set the default environment to <span class="p-color-bg">dev</span> so that we can simply run:
Since this is the first time we’re deploying the project, Garden will have to:
- build the <span class="p-color-bg">backend</span> container image (in the cluster)
- deploy the <span class="p-color-bg">backend</span>
- deploy the Postgres Helm chart
- run the tasks we’ve defined to initialize the database.
Subsequent runs will be much faster since in most cases the Helm chart will already be deployed, and Garden can leverage build caches for the <span class="p-color-bg">backend</span> service.
At this point, your entire stack should be deployed and Garden should be watching your code for changes.
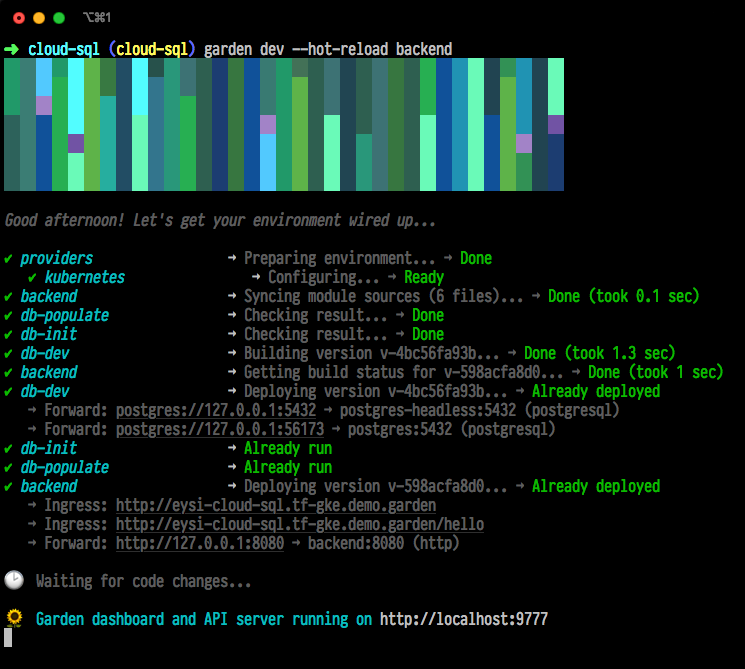
The Garden dev command does it all: Build, deploys, tests, and runs tasks.
If you now make changes to the <span class="p-color-bg">./backend/app.js</span> file, you'll notice that Garden hot reloads the backend module.
However, we’re still not able to the call the <span class="p-color-bg">backend</span> service. For that, we need to expose it to the outside world.
Step 4 — Add the external cluster IP address to your DNS provider
To get the external IP address of your cluster, run:
You should get an output like:
You’ll need to add the value under the <span class="p-color-bg">EXTERNAL_IP</span> field to your DNS provider. We recommend including a wildcard subdomain so that each developer can have their own development hostname.
How you do this will depend on how you manage DNS in general and is outside the scope of this post. See here for information on configuring ingress controllers and setting up TLS with Garden.
Once you’ve configured your DNS, you need to edit the <span class="p-color-bg">defaultHostname</span> field in the project level <span class="p-color-bg">garden.yml</span> file:
If the dev command is still running, Garden will re-deploy the stack with the correct hostname set.
The project is configured so that each user has their own hostname in the development environment. For example, a user named Fatima will get <span class="p-color-bg">fatima-cloud-sql.yourhost.com</span> and Bob will get <span class="p-color-bg">bob-cloud-sql.yourhost.com</span>.
For staging, we’re simply using <span class="p-color-bg">staging-cloud-sql.yourhost.com</span>.
Step 5 — Test the endpoints
Now that we’ve configured DNS, we can connect to our app from the outside.
The app is a simple Node.js webserver that has a <span class="p-color-bg">/hello</span> endpoint that returns entries from the database.
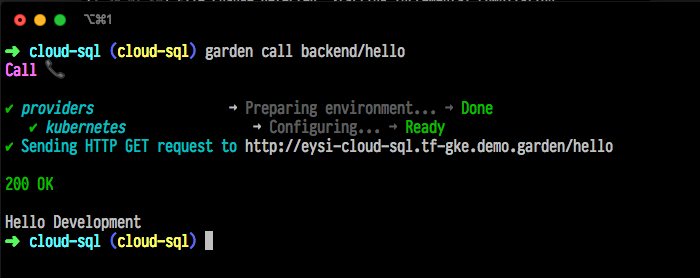
A simple way to test the endpoint is to use the Garden call command:
The output should look like this:
Calling the hello endpoint
You can also go to the Garden dashboard by opening http://localhost:9777 in a browser when Garden is in watch mode. On the Overview page you can click the endpoint and view the result inline.
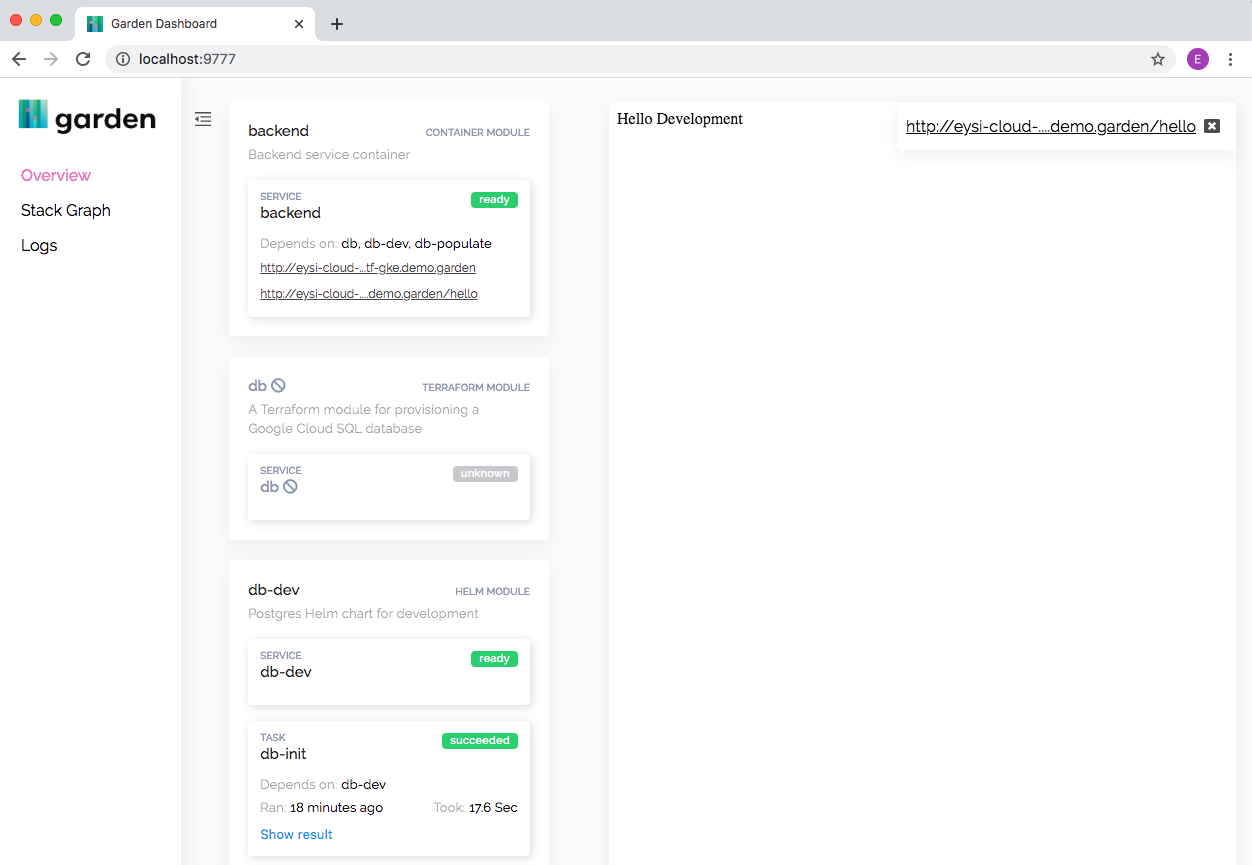
The Garden dashboard
In the module level <span class="p-color-bg">garden.yml</span> configuration for the <span class="p-color-bg">backend</span> service, we've defined an integration test that checks whether the backend is able to read from the database. You can enable it by uncommenting it:
Notice that the test depends on the <span class="p-color-bg">backend</span> which in turn depends on the <span class="p-color-bg">db-init-dev</span> task. This means that Garden will ensure that the development database is running and initialized, and that the <span class="p-color-bg">backend</span> is running, before running the test.
If the dev command is still running, Garden will run the test after you uncomment the lines. You can also run it manually with the <span class="p-color-bg">garden test</span> command.
This way, your integration tests run as you develop the application.
Of course this is a very simple example, but for more complex applications, this kind of feedback is incredibly valuable. Instead of waiting until CI to find out that your changes broke a downstream service, you’ll know right away.
Step 6 — Deploy to staging
Once our test is passing, we can confidently deploy to the <span class="p-color-bg">staging</span> environment by running:
This time, Garden will ignore the Postgres Helm chart since it’s only enabled in the <span class="p-color-bg">dev</span> environment. Instead, Garden will use the Terraform module from the <span class="p-color-bg">db-staging</span> directory.
It will apply the stack and create the Cloud SQL database instance. This can take a few minutes.
Once that’s done, it’ll deploy the <span class="p-color-bg">backend</span> service to the <span class="p-color-bg">staging</span> environment with the environment variables needed to connect to the Cloud SQL database.
Step 7 — Initialise the Cloud SQL database
Since the Cloud SQL database has a private IP and is on the same network as the cluster, we can connect to it directly from the backend service.
First, let’s initialize it with the <span class="p-color-bg">run task</span> command:
This task will create a <span class="p-color-bg">user</span> table and populate it with a user named 'Staging'. (Note that for the development environment we ran the <span class="p-color-bg">dev</span> command which automatically runs tasks. Here we're doing it manually.)
The environment variables needed to connect to the database are set in the <span class="p-color-bg">garden.yml</span> configuration for the <span class="p-color-bg">backend</span> service:
Environment variables
Notice how the the Terraform <span class="p-color-bg">db</span> module returns the actual private IP address of the Cloud SQL database after it has created it.
This means that the <span class="p-color-bg">backend</span> service can connect to the persistent Cloud SQL database from the <span class="p-color-bg">staging</span> environment without us having to change a line of code.
Let’s give it a try:
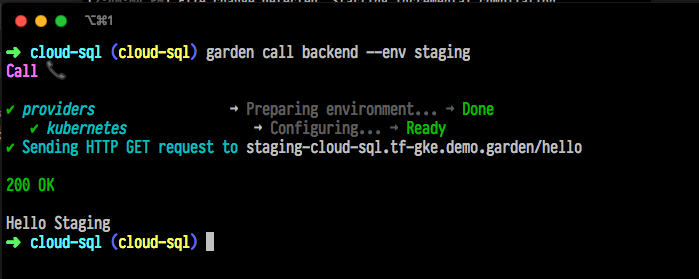
Calling the hello endpoint in the staging environment
And that’s it, our application is now running in the <span class="p-color-bg">staging</span> environment and reading from the Cloud SQL database.
Cleanup
To cleanup, simply delete your GCP project, and the Terraform state:
Summary
To briefly recap, we’ve:
- Created a GKE cluster with a development namespace for each user, and a single staging namespace.
- Deployed the application to the development namespace and seen how fast Garden updates it on changes.
- Added the external cluster IP to our DNS provider and tested the <span class="p-color-bg">/hello</span> endpoint.
- Added an integration test that runs as we develop.
- Provisioned a persistent Cloud SQL database for our staging environment and deployed our application there.
- Initialized the Cloud SQL database and verified that our app works in both environments.
I really hope that you’ve found this guide useful. Everything I’ve shown you is open-source and available on our GitHub page.
For more information on using Garden, check out our docs. And if you have any questions whatsoever, head to our community channel on the Kubernetes Slack, we’d love to hear from you!