


I was once a skeptic. I thought Kubernetes would never be as simple and as easy as <span class="p-color-bg">docker compose up</span>. Well, it's not only possible, it's worth the extra lift to get there. In this article, I'll show you how to take a Docker Compose application and turn it into a Kubernetes application with a minimum of fuss.
It’s time to adopt Kubernetes not just for production but everywhere across the entire software-development lifecycle. Never again worry whether it's Docker-problem or a Kubernetes-problem because it’s all one architecture, one problem space to solve.
Join me as we examine a typical Flask Python microservice written for Compose and transform it to a ready-to-rock K8s code. This is the first in a series of articles covering architecting for cloud native written for users who may be thinking of or already starting their journey to Kubernetes local, remote, “remocal” or anywhere in-between.
Docker Compose vs. Kubernetes: Why Kubernetes? Why now?
Tell me you haven't seen this before:
- Your developer application stack runs local. The bigger the application, the more resources it consumes, until a developer’s laptop is running so hot, memory gets swapped to hard disk and work slows to a crawl.
- Your container gets pushed to production but production is running Kubernetes. Your application stack is now running in a different environment with different networking, different storage, and different orchestration. There are bugs. There are quirks. There are conventions. There is stress.
Kubernetes, despite its complexity, becomes the simplest tool when it’s one fewer tool in your toolbox.
Mirroring production is vital to reducing stress, cognitive load, and avoiding unforeseen bugs, quirks, and conventions around networking and orchestration.
Getting ready to migrate from Docker to Kubernetes
In order to illustrate the challenges of a Docker Compose style of development, I'll briefly go over a typical application stack bundling an app, database and the Docker Compose files that support a team using Compose in both development and production. If you want to follow along, have ready:
- A Kubernetes cluster, either remote or local. The simplest way to get started is using Docker Desktop or any of these other local Kubernetes flavors.
- Docker Engine and Docker Compose
- VS Code
- The Dev Containers extension
- The Helm CLI installed
Set up a Kubernetes cluster with a dev container
While you can use a local Kubernetes cluster to follow along, the real power comes from liberating the developer from the Hellfire of needing to run a local cluster. I recommend launching a remote cluster like Civo or Scaleway because they’re dirt cheap, fast, and I don’t need to delve deep into the Mines of Moria to get cluster credentials.
Clone my repo, open it in VS Code, then open the command palette and select <span class="p-color-bg">Dev Containers: Reopen in Container</span>. This will build a Docker image with all the tools we need to run our application and connect to our Kubernetes cluster.
Use Docker Compose to set up a scalable Python application with Flask and CockroachDB
Our code sample is a Python application that creates and seeds a CockroachDB database. When we visit http://localhost:5000 in our browser, our application returns our test data as a JSON object.
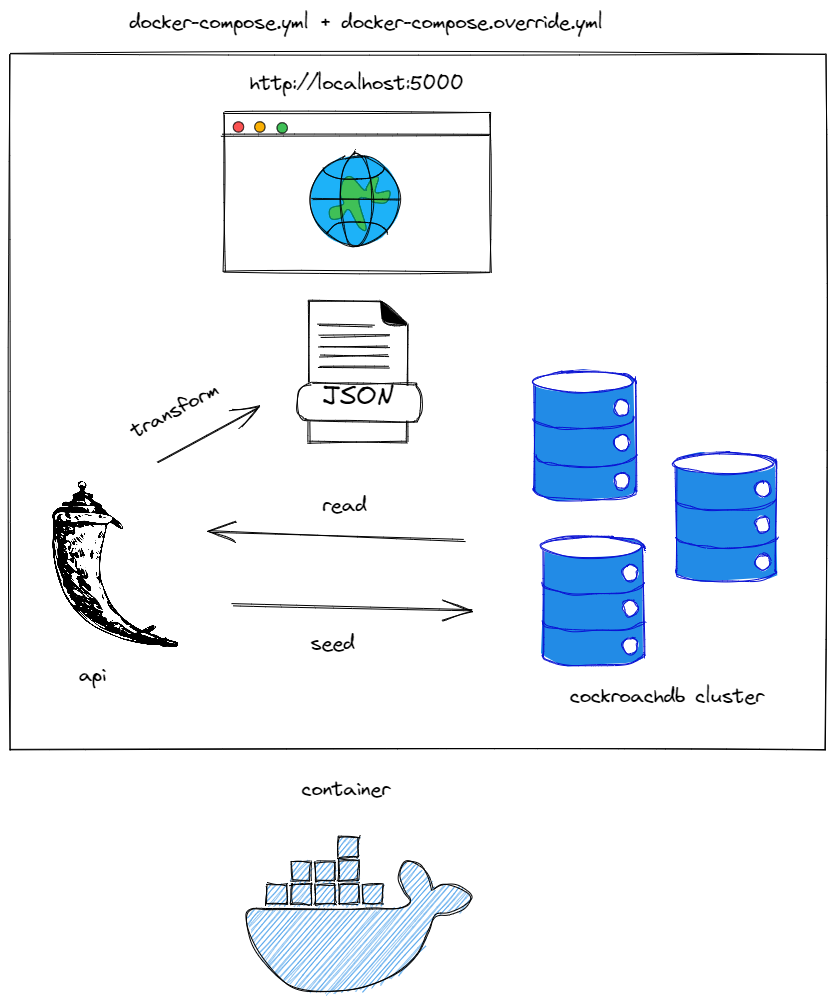
CockroachDB is Postgres wire-compatible and supports most of Postgres’ SQL syntax. As a distributed database, CockroachDB is the most elegant choice to demonstrate scaling from a locally driven workflow to a mirror of production with a minimum of changes.
Using multiple Docker Compose files for development and production workflows
Because we are a team following Compose best practices we use 2 <span class="p-color-bg">docker-compose*.yml</span> files:
- <span class="p-color-bg">docker-compose.yml</span>, our base, canonical, file
- <span class="p-color-bg">docker-compose.override.yml</span> which automatically overlays our base file with everything we need for development when we run <span class="p-color-bg">docker compose up -d</span>
A new database needs to be seeded, the database cluster initialized and other day 1 operations. I’ve included a simple script, <span class="p-color-bg">up.dev.sh</span> for your reference and use. <span class="p-color-bg">up.dev.sh</span> builds our image, creates a database and seeds it with our data.
Dockerfiles for development and production deployments
In our hypothetical microservice stack, our smallest atomic unit of containers s the Doc<span class="p-color-bg">Dockerfile.dev</span>, a recipe to prepare all the ingredients that goes into cooking our microservice container:
<span class="p-color-bg">Dockerfile.dev</span>
That concludes the tour of our development stack. Let's take a look at how we can use Kubernetes to mirror our development stack.
Migrating from Docker Compose to Kubernetes with Kompose
Despite appearances, Compose YAML and Kubernetes YAML are incompatible specifications.
That's not as big an issue as you might think: take your existing Compose YAML and dispose of it.
One of the benefits of going Kubernetes is access to a rich ecosystem of packages created by vendors and users. Just like the software you'd install on your local machine, we can install cloud native software to our Kubernetes cluster more simply than defining it as a Compose service. These cloud native software packages are called Helm charts.
By using <span class="p-color-bg">helm create $CHARTNAME</span>, Helm library charts, and Helm's vast package ecosystem, we can replace our Flask microservice container defined in Compose YAML with a Helm chart and deploy a CockroachDB cluster from its Helm chart repository.
Don't worry if all this talk of Helm this, Helm that gets you thinking you're Willy Wonka or the Cheshire Cat. We'll go over all of this in detail.
Helm: the package manager for Kubernetes
Helm is a package manager for Kubernetes created by Deis Labs in 2015, now under the umbrella of the Cloud Native Computing Foundation.

Helm, at its core, is a package manager and a method of defining packages that uses Kubernetes YAML to define the resources that make up a package. Helm packages are called charts and are defined in a folder with a <span class="p-color-bg">Chart.yaml</span> file and a <span class="p-color-bg">templates</span> folder containing Kubernetes YAML files.
Helm library charts are a method of defining a chart that can be used as a dependency in other charts. Library charts are a great way to share common Kubernetes resources across multiple charts.
We'll use a Helm library chart called The Helmet to provide the common Kubernetes resources we need to run and deploy our Flask application to Kubernetes.
First, generate a Helm chart skeleton for our Flask app with <span class="p-color-bg">helm create flask-app</span> which creates the folder, flask-app to home our new artifact:
Remove all the files under the <span class="p-color-bg">templates</span> folder. Create a new file, <span class="p-color-bg">app.yaml</span> under <span class="p-color-bg">templates</span> and add <span class="p-color-bg">{{ include "helmet.app" . }}</span> to its empty file. Remember, a library chart provides common resources, so we don't need to define them in our chart.
Declare The Helmet as an explicit dependency:
Import the library chart:
Build and push your Dockerfile image to a registry of your choice. I'm using Docker Hub.
And fill in your <span class="p-color-bg">flask-app/values.yaml</span> file to with your image name. View The Helmet's README for all available options.
Deploying applications to Kubernetes with Helm Charts
To deploy our chart, run <span class="p-color-bg">helm install my-flask-app ./flask-app</span>. This installs our app as a Helm Chat with the Release name <span class="p-color-bg">my-flask-app</span>. The release name is an identifier of the chart you install on your Kubernetes cluster should other instances of the same Chart exist in the same namespace. As an example, if you installed one instance of CockroachDB for development and another for production on the same cluster, giving them suitable release names would help you to identify which is which. We can see that Helm returns to tell us our Chart was installed successfully:
To install our CockroachDB Chart, we first add the Chart Repository (chart repositories are decentralized, so we first add where our package is hosted before installing) with <span class="p-color-bg">helm repo add cockroachdb cockroachdb <https://charts.cockroachdb.com/></span>, then install it with <span class="p-color-bg">helm install my-cockroachdb cockroachdb/cockroachdb --version 11.1.0</span>. Your command prompt won't be returned to you until Helm finishes installing the CockroachDB Helm Chart to your cluster, which can take anywhere from 1 to 3 minutes to complete.
Helm should succeed and print out some very helpful details on our installation:
Learn more about using Helm charts with Garden as you continue your journey to cloud native.
The difference between Docker Compose and Kubernetes networking
In Docker Compose, a container is accessible by its hostname, identical to the name of the container itself. This name is specified in the docker-compose.yml file, and is used to reference the container within the Docker Compose environment. For example, our CockroachDB cluster is composed of 3 containers, we've named roach-0, roach-1, and roach-2. From within this Docker network, our Flask app can connect to the CockroachDB cluster by any of their container names. In this case, roach-0.
In Kubernetes, a container's fully qualified domain name (FQDN) is more complex and is automatically generated based on the name of the container and the namespace it is running in. Let's look at an illustrated example of the FQDN returned on successful install of our CockroachDB Helm chart:
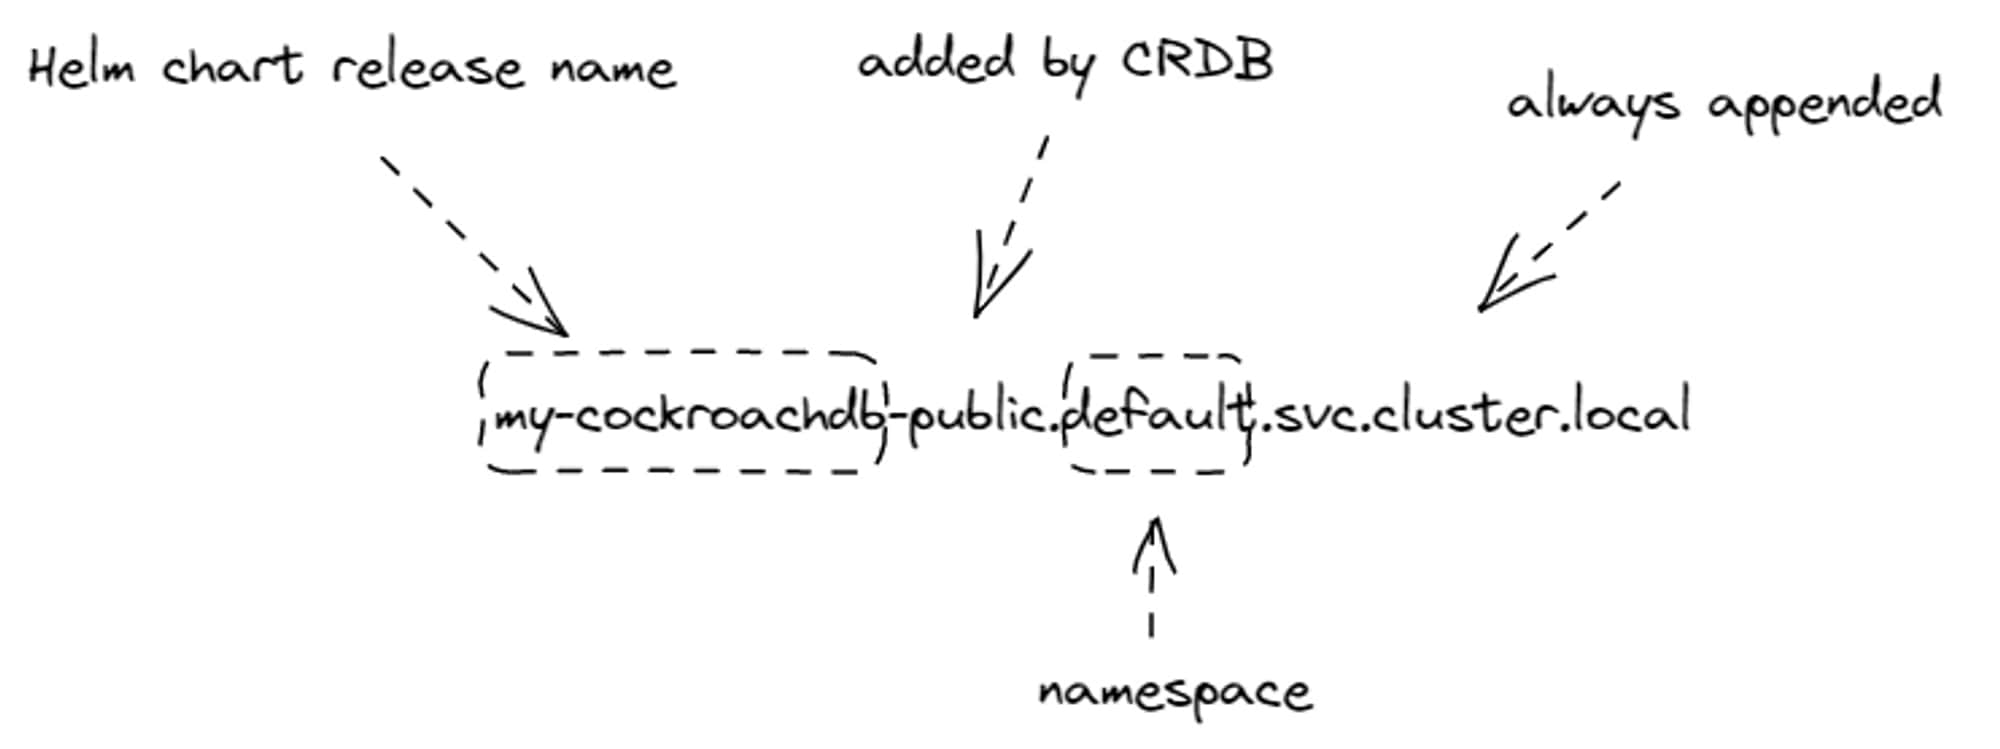
When applications are within the same namespace, they can connect to each other by the first part of the FQDN, the name of the container. In our case, our Flask app can connect to our CockroachDB cluster by the name of the container, <span class="p-color-bg">my-cockroachdb-public</span>. This is the same name we specified in our <span class="p-color-bg">flask-app/values.yaml file</span>.
Initialize CockroachDB cluster with kubectl
Now run my helper shell script, up.kube.sh, which creates our database user and assigns it a password. Then re-run our request to Flask to create and seed our database:
Congratulations, you've gone from your Compose stack to Kubernetes in a little less than an hour!
Build your dream internal developer platform with Garden
You may have noticed there was a manual image build step in our workflow. This is a great opportunity to introduce Garden, a free and open source tool for building, testing, and deploying applications to Kubernetes in CI/CD, locally, or anywhere in-between.
Garden rebuilds, tags, and publishes your Docker images to any registry, and can use your Kubernetes development clusters as image builders to cut down development time and reduce the cognitive load of switching between tools.
Check out our Quickstart Guide to get started with Garden and Kubernetes.
Join our community on Discord to ask questions, share your experiences, and get help from the Garden team and other Garden users.
[Heading image: Anonymous, section detail of “Geigyo Hinshu Zukan” (Fourteen Varieties of Whales) (1760). Credit: New Bedford Whaling Museum]